1. Trade Setup
1.1 Trade Interface
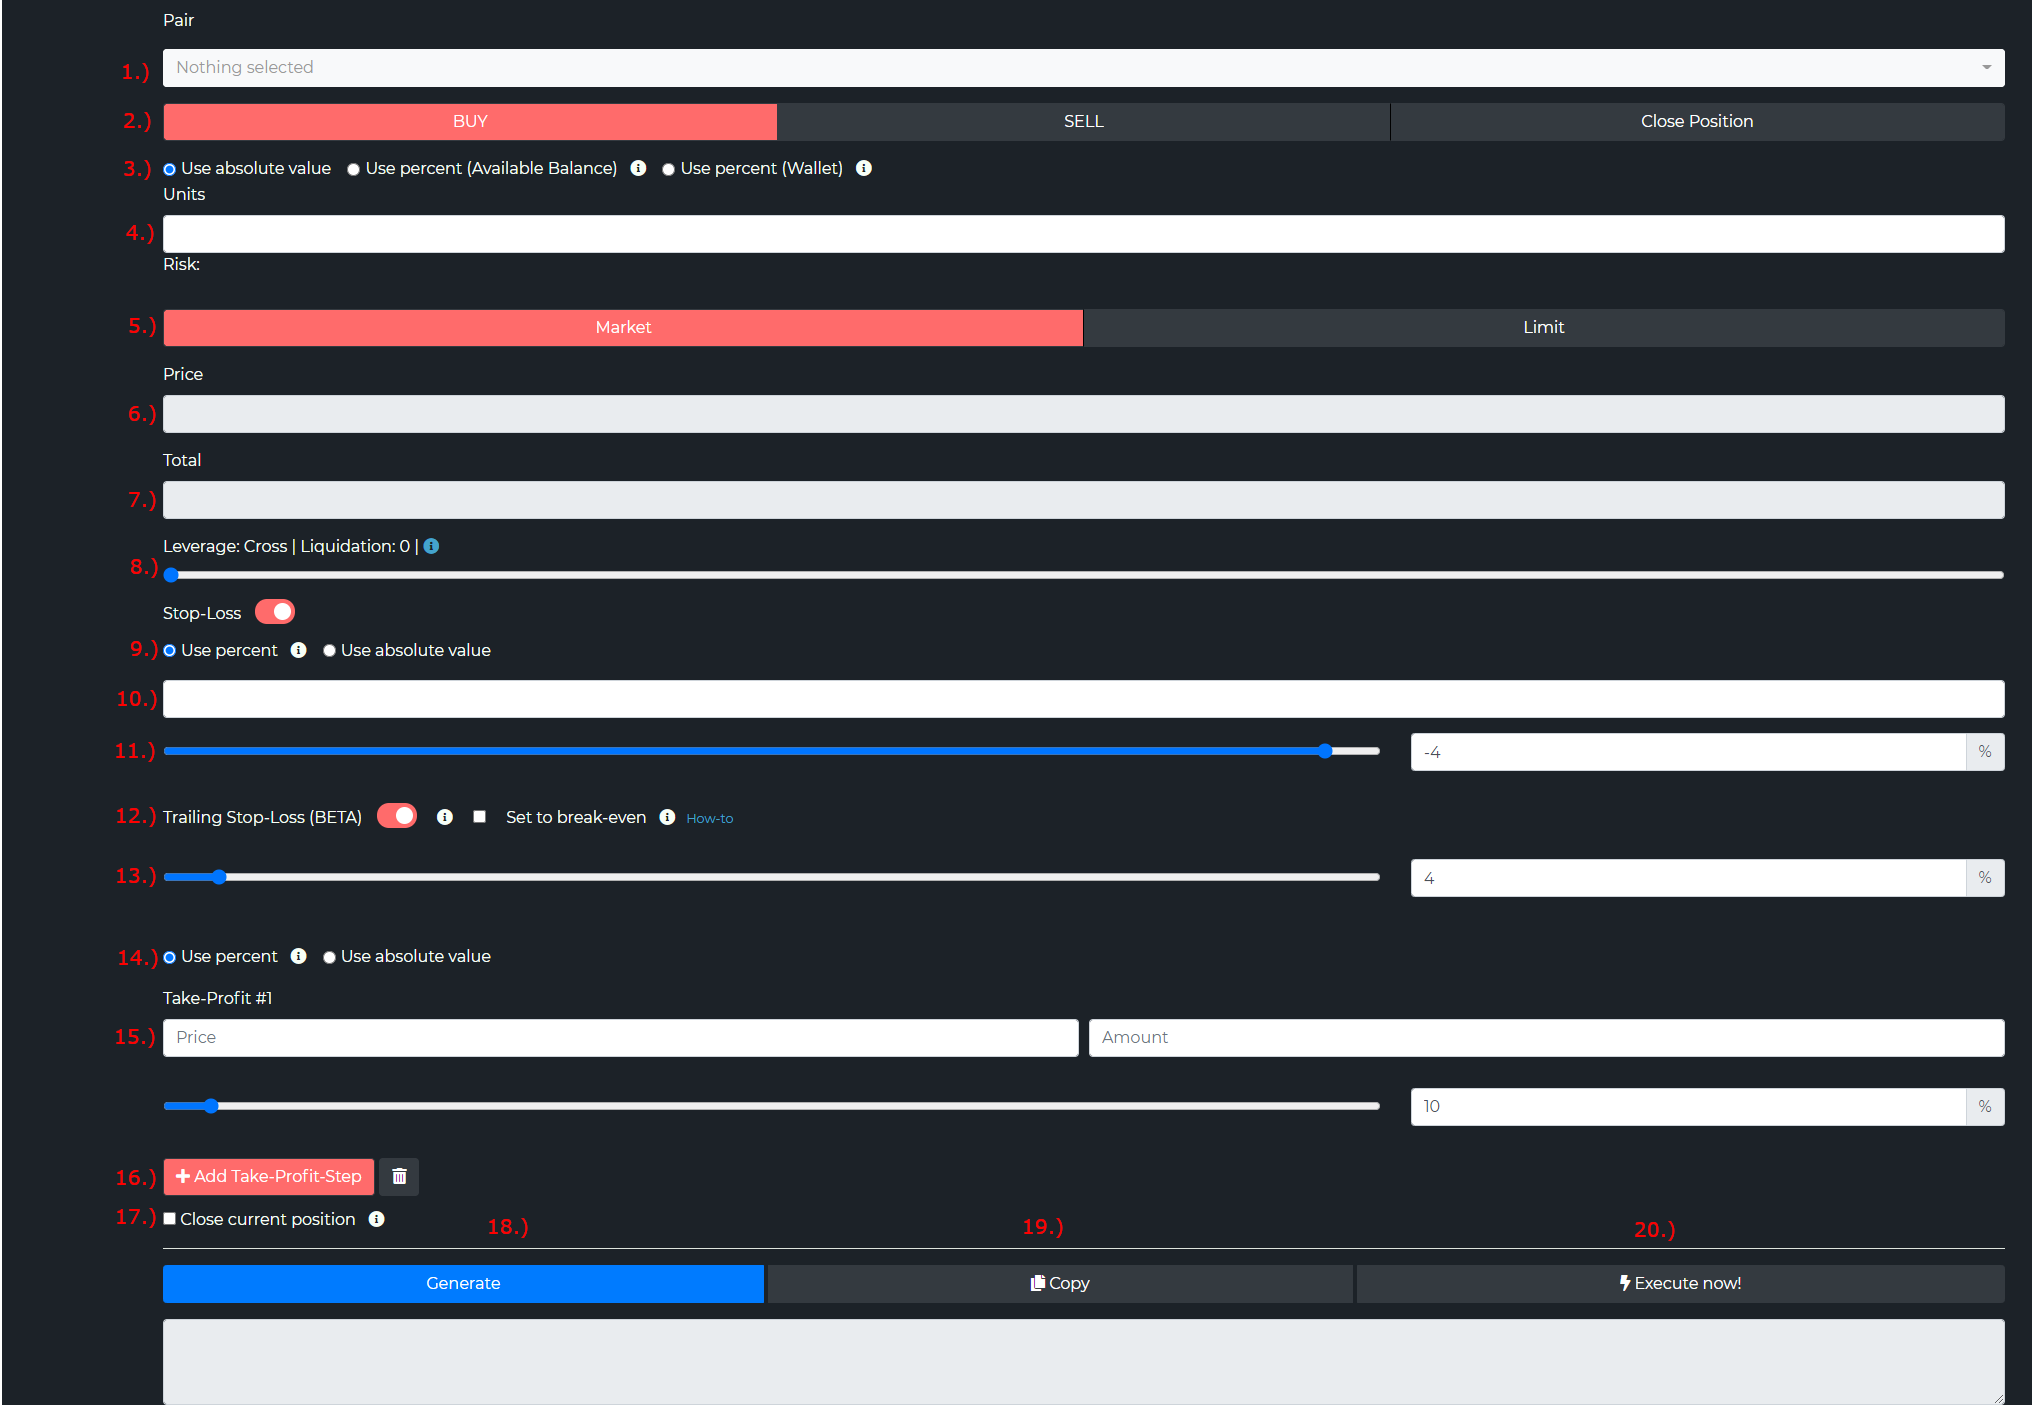
- 1.) The trading pair
- 2.) The trade type (on leverage exchanges buy = long, sell = short). "Close" will exit your position, no matter if long or short. If there is no open position nothing will happens.
- 3.) Absolute value means you have to specify a fixed amount for the trade. "Percent available balance" means you use a percentage of your available balance. With "percent wallet" you trade the entire balance, even if some of it is locked up in a trade. Be careful with this option because under some circumstances the trades may not open. General recommendation if you use one of the percent options: It is safer to use 95% instead of 100%. This will let room for fees and slippage.
- 4.) The trade size (amount of coins you want to buy or sell)
- 5.) The order type
- 6.) The price in case you use a limit order
- 7.) The total amount (order size x price)
- 8.) On leverage exchanges you can set your leverage. On bitmex you have to drag the slider to 0 to use cross. On binance futures & bybit you can set this with a radion button.
- 9.) You can activate a stop-loss and choose if you want to use a percent value below your entry or a fixed value
- 10.) The stop-loss value. In case you use "percent" this will be filled in automatically
- 11.) With the slider you can change the percent value
- 12.) Trailing SL is explained in detail in this video: click
- 13.) The trailing percentage value.
- 14.) You can activate (multiple) take profit targets and choose if you want to use a percent value or a fixed value for the target price.
- 15.) In the amount field you need to specify the amount you want to exit at this take profit target. In case you trade a percent value of your wallet, you need to specify a percent value you want to exit.
- 16.) You can add more take profit targets with this button or delete the last one
- 17.) If you choose this option and you have an open position of the opposite direction it will be closed. This is useful if you want to flip a position (e.g from LONG to SHORT).
- 18.) With this button you can generate the trade command
- 19.) This button copies the trade command to the clipboard
- 20.) You can execute the trade directly on the exchange. This is useful for testing if you want to check if everything is working correctly.
1.2 Webhook URL
The webhook endpoint for tradingview is:
If you want need really fast execution you can use this endpoint. This one will not go through our queue system. But for most users we recommend the default webhook:
The IP list for this endpoint could be found here
IMPORTANT: Binance Futures users should use this endpoint:
For faster execution on Binance Futures you can use this endpoint. This one will not go through our queue system. But for most users we recommend the webhook above:
The IP list for this endpoint could be found here
1.3 Setup E-Mail signals
You can enable TradingView E-Mail alerts to trigger your trades. This is useful for two reasons:
- For Users without a TradingView Pro Account: Users who do not have a TradingView Pro account are not able to use webhooks.
- As a Backup for Webhook Users: For users who use webhooks, the E-Mail alert acts as a second safety line. In rare cases where TradingView has issues sending the webhook signal correctly, the E-Mail alert will execute the missing webhook signal.
- Go to the settings page here
- Copy the displayed E-Mail and paste it into your TradingView account settings. Note: TradingView Pro users can add a second E-Mail for alerts to their account, so you will still receive E-Mail alerts at your default email address.
- Set up the alternative email for TradingView alerts.
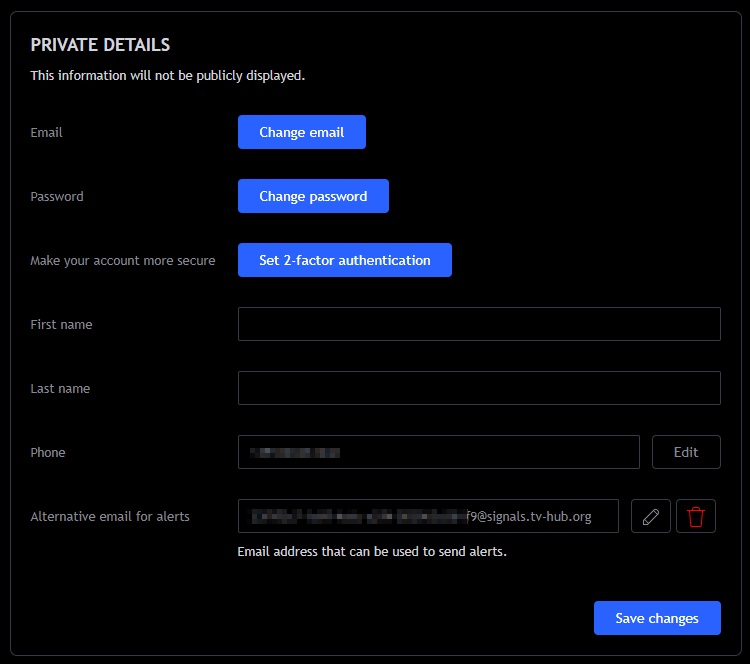
- After adding the E-Mail to your TradingView account, you will need to insert a verification code. This code will be displayed on TVHub on your E-Mail signals settings page. Simply refresh the page after you have added the E-Mail to TradingView to see the verification code.

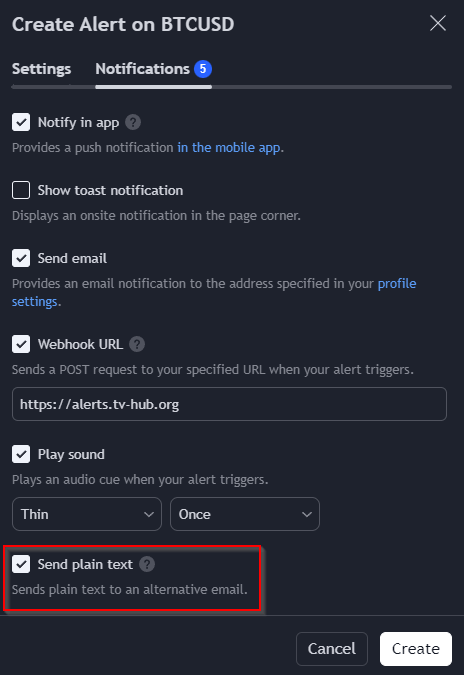
- When creating a TradingView alert make sure to enable the option "Send plain text"
1.3.1 E-Mail Signals as Webhook Backup
In rare cases, TradingView may have issues sending the webhook signal correctly. In such instances, the E-Mail alert will execute the missing webhook signal. Therefore, we recommend enabling E-Mail alerts as a backup for webhook users. See chapter Setup E-Mail signals
To ensure this works, your trade command must include the following line:
Additionally, TVHub will add a 5-second delay to E-Mail signals to ensure webhook signals are executed first. If you wish to override this rule, simply add -1 as a delay to your trade command via the command builder.

1.4 TradingView Alert Setup
Go to tradingview.com to setup the alert. Wherever you can create an alert at TV you are able to trigger a trade. In this example we are using the BUY alters of the MarketGod Indicator.
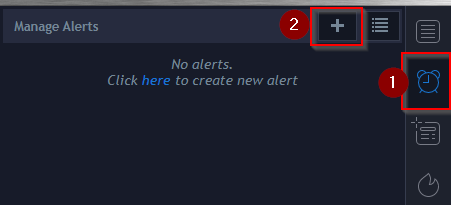
Create an alert like this:
The create alert form looks like this:
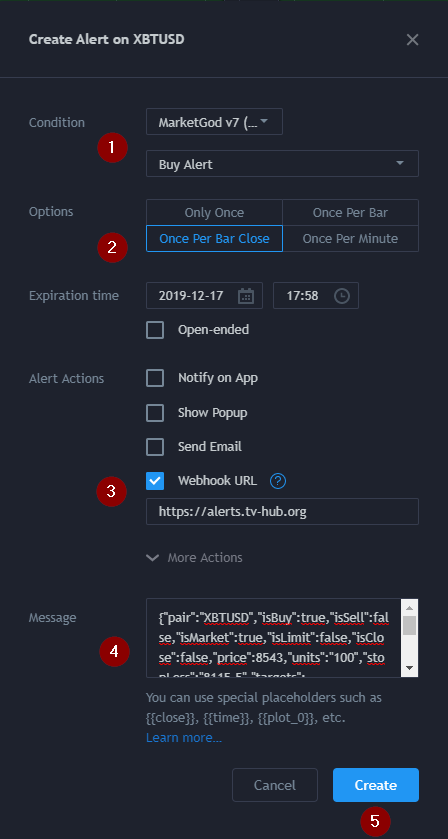
- ) Choose your alert condition
- ) Choose the alert option. "Once Per Bar Close" is recommended to avoid indicator repainting. "Once Per Bar" could work for other conditions as well.
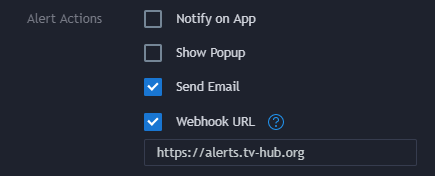
- ) Activate the checkbox "Webhook URL" and paste this URL: https://alerts.tv-hub.org
- ) Paste your alert message that you created with the tv-hub exchange interface. For more details on this topic take a look at the trade examples.
- ) Hit the create button
1.5 Set Stop-loss
To set a stop-loss you need to tick the checkbox "Stop-Loss"

- ) Activate the stop-loss (1)
- ) If you choose the option "Use percent" (2) the SL will always be placed relative to your current entry price. If you are LONG 4% below your entry or if you are SHORT 4% above your entry.
- ) The option "Use absolute value" (3) will always place the SL at the value you provided.
1.6 Set Take-Profit
To set a take-profit you need to click the button "Add Take-Profit-Step"

If you want to set the price for your take profit you have two options. 1.) use a precent value. In this example 10% above (for LONGS) or below (for SHORTS) from your average entry. The TP will always be placed relative to your current entry price.

Example:

Or 2.) you define a fixed price where the take profit should be placed.

For the order size of your take profit you are able to define the amount as a fixed value like $100 or 0.1 BTC

Or you use a percent value. For example exit 30% at target 1.

In this case all amount values must be combined equal or less than 100. For example if you have 4 take-profit steps you can set each TP to 25.
1.7 Set Trailing Take-Profit
To submit a trailing take profit order you have two options:
1.) Define a trailing take-profit when you open a position by clicking on the button "Add Take-Profit-Step":

NOTE: On Binance-Futures you can set multiple trailing TP orders. On Bybit just one.
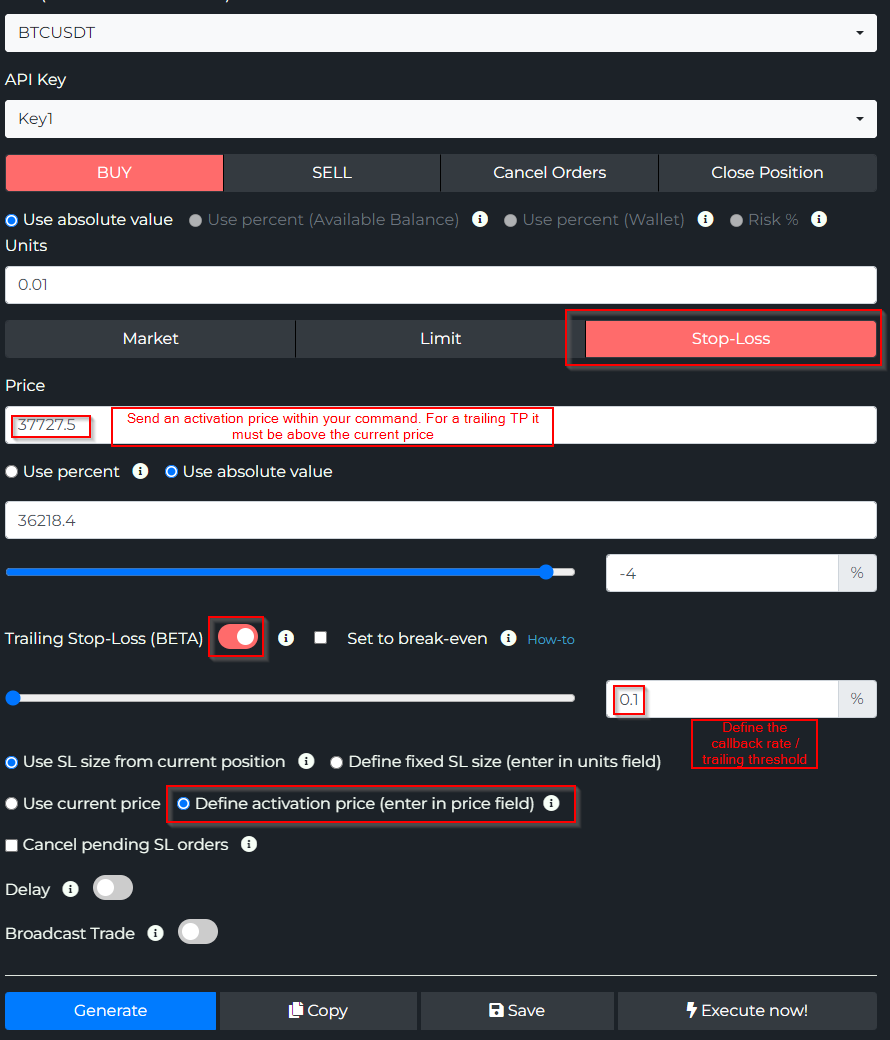
2.) Send a separate trade command which only submits a trailing TP order. For example when you already have an open position:
1.8 DCA / scaling orders
To activate the DCA (dollar cost average) orders you need to tick the checkbox "Use DCA (Order-Mesh)". With this option you are able to scale into a position.

- ) Choose the range in percent. In this range the system will place the orders based on your entry price.
- ) Choose the number of orders. You can define up to 10 scaling orders.
- ) The system will split the order size evenly between the initial order and the dca orders.
- ) For example you define a trade command to open a $100 position. And you define 4 DCA orders 5% below the entry. The system will now generate 5 orders (the initial order + 4 DCA orders). Each order with the size of $20.
- ) You can use it with a market order. In this case the first order will enter immediately and the DCA orders will be placed as limit orders below the entry.
- ) Or you can define all orders as limit orders.
- ) This will also work with a percent value of your balance.
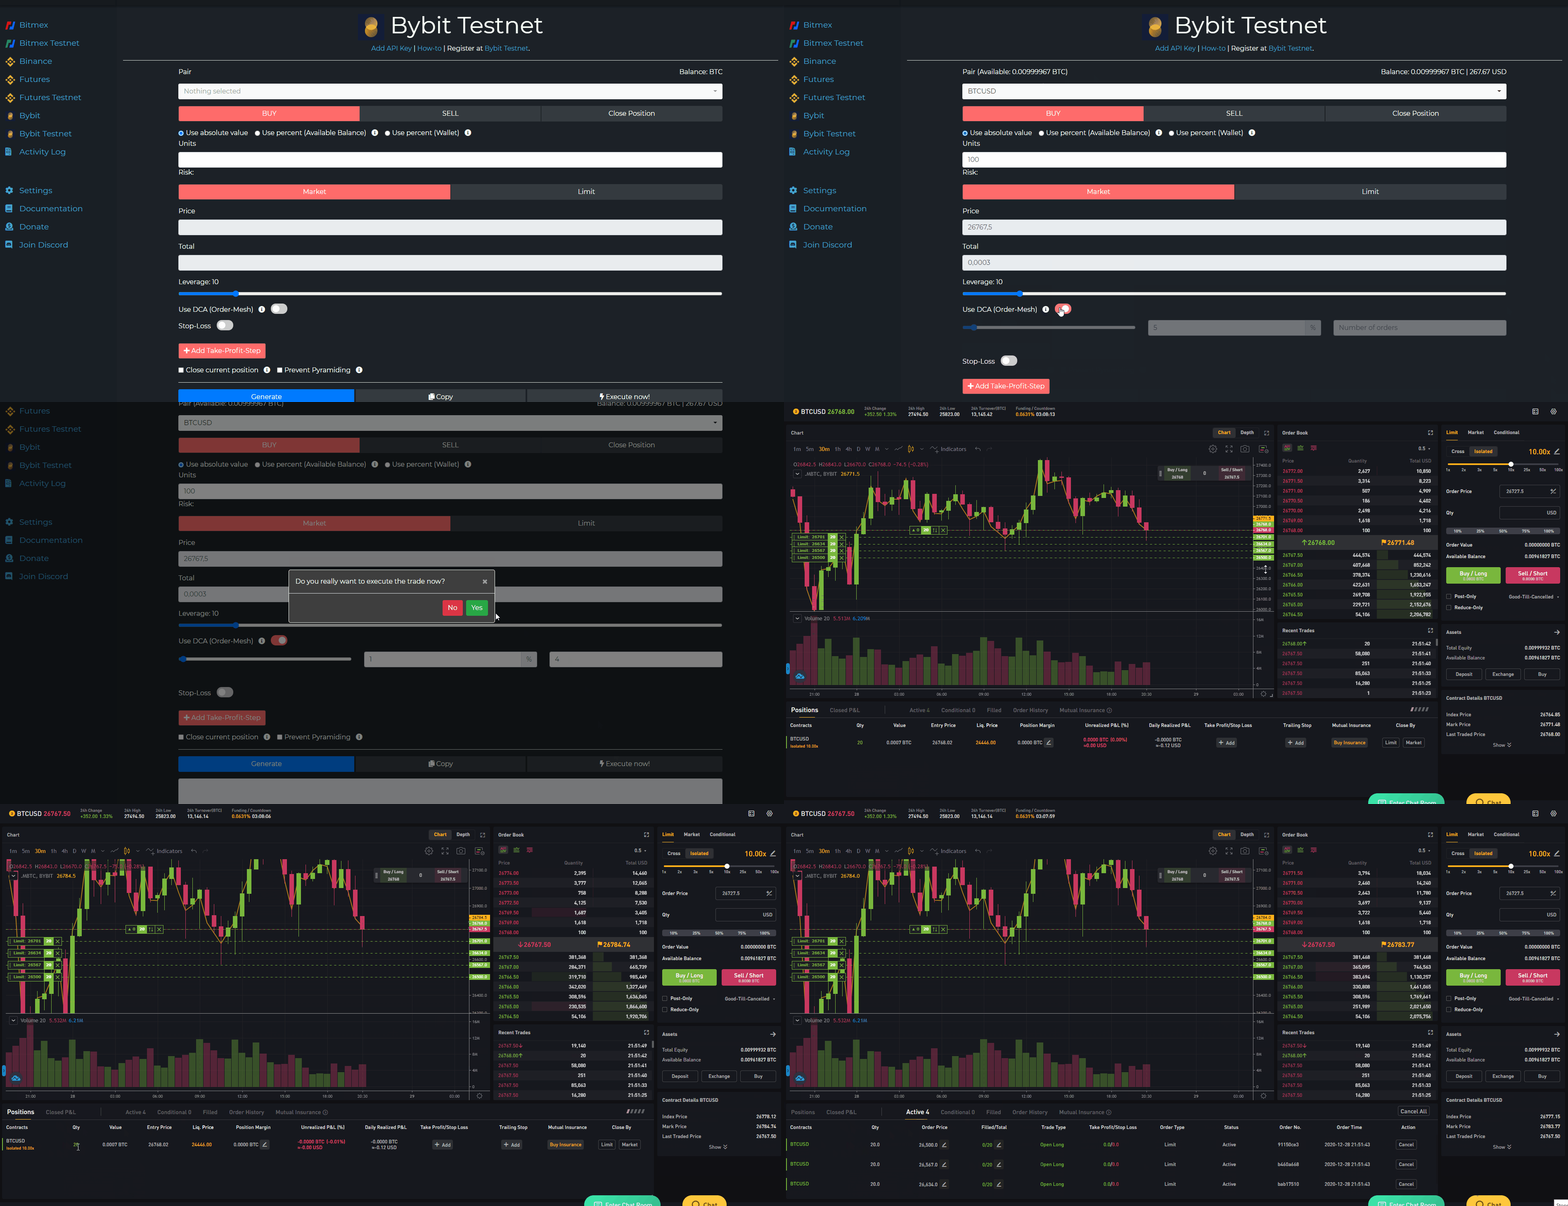
1.9 Close Position
If you want to exit a postion you can use the close command. The system will execute a market order to exit the position as soon as possible. Additionally all open orders of the current pair are cancled (limit orders, SL)
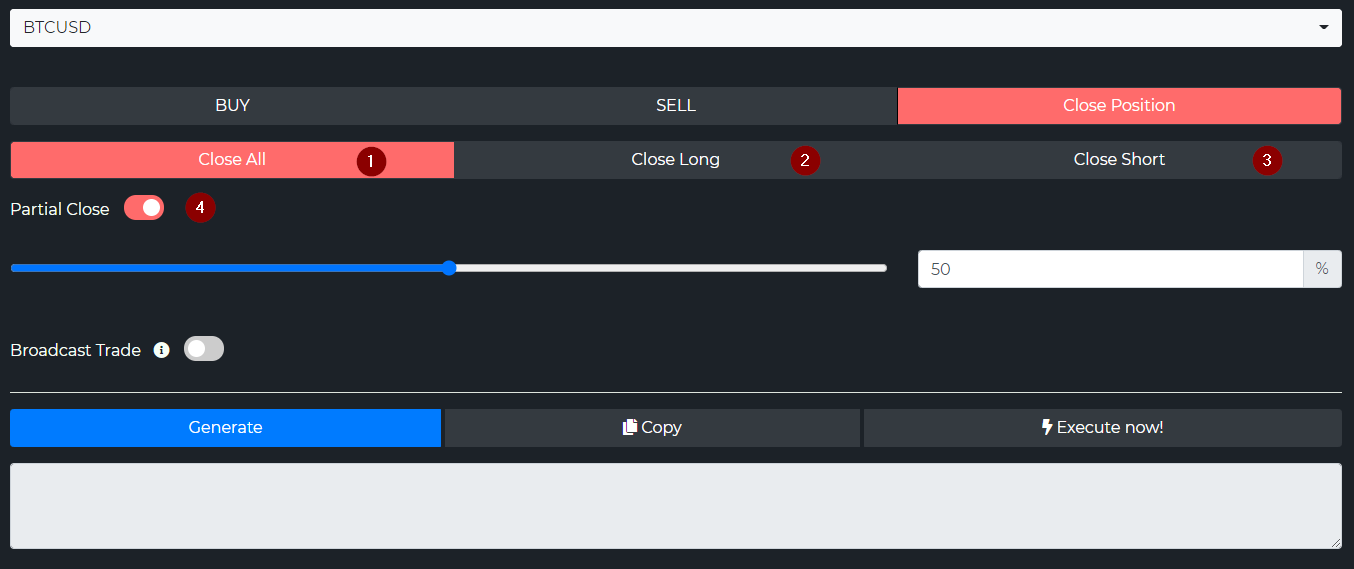
If you activate the order type "Close position" you have the following options:
- ) "Close All" will close the current position no matter if it's long or short.
- ) "Close Long" will only close a long position.
- ) "Close Short" will only close a short position.
- ) "Partial close" allows you to exit just a percentage of your position.
1.10 Limit Order Chasing
The limit order chasing option can move your limit order to the front of the orderbook as long as it remains unfilled. By default, this repositioning will occur every 20 seconds, up to 180 times (in total for one hour). It's possible to modify the delay interval.

- ) You must select the option "Use best price (Best Bid/Ask price)" in order to insert the limit order at the current best price on top of the order book
- ) Activate "Use order chasing". The system will attempt to update your order 180 times. If the order remains unfilled after these attempts, you can choose to either enter a market order or cancel your current limit order.
- ) Activate the option "Change update intervall" if you want to adjust the default settings. By default, the order updates occur every 20 seconds, up to a maximum of 180 times (in total for one hour). You can adjust this interval to be as short as 1 second or as long as 300 seconds. However, keep in mind that the total number of update attempts remains unchanged. With a 1-second interval, the order chasing period will be only 3 minutes. Additionally, be aware that setting a very low delay may lead to rate limiting issues with the exchange.
1.11 Binance-Futures Hedge Mode
On Binance-Futures you can use the "Hedge Mode". This allows you to open long and short positions at the same time. The prerequisite for this is to change the position mode on Binance-Futures to "Hedge Mode"
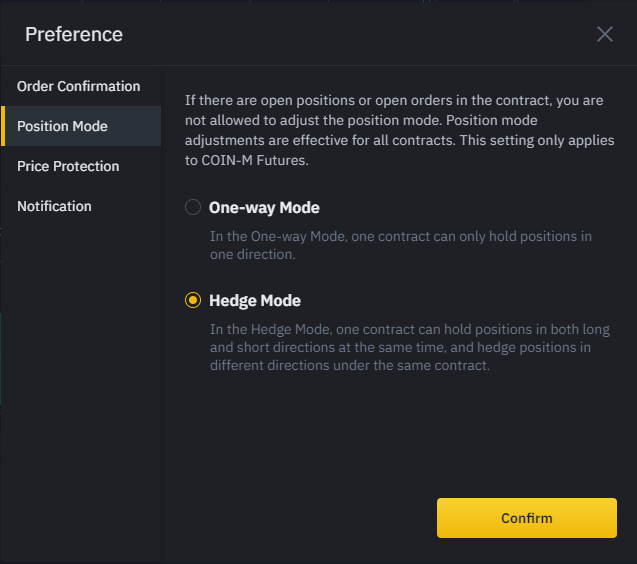
If you want to use the hedge mode with your trade commands you have to activate the checkbox "Hedge Mode":

If you use the close command with the hedge mode "close all" would close long & short while the other options close only one side:

1.12 Save trade setup
You can save your trade setup to load and edit it at a later time.
1.) Create the trade command by clicking the "generate" button
2.) Then click on the "save" button and give the trade command a name.

1.13 Load trade setup
You can load your trade setups:
1.) Click on the "open" button" in the left upper corner:

2.) Then click on one of your trade setups:
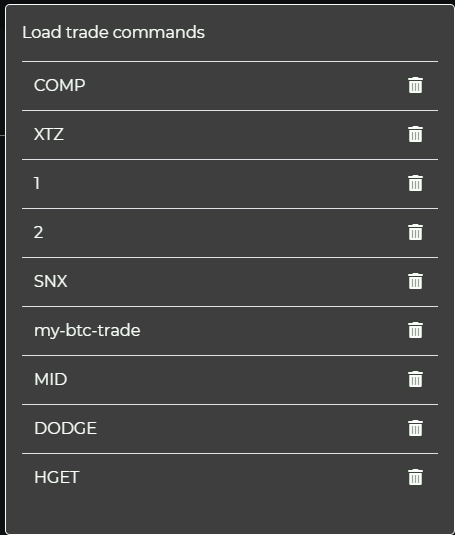
1.14 Paste trade command
For example if you have a running TradingView alert and you want to modify the trade command a bit. You can do it like this:
1.) Go to your alert and click edit. Then copy the trade command.
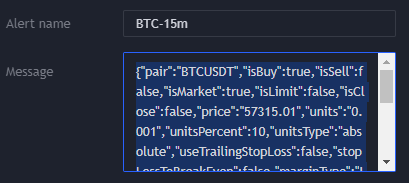
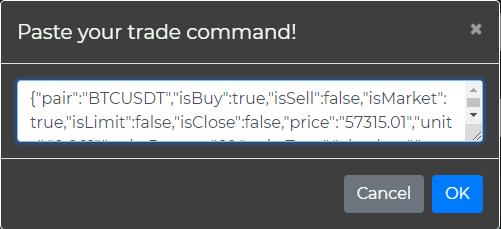
2.) In tv-hub click on the "paste" button" in the left upper corner:

3.) Paste the command in the textbox and click OK. The UI will parse the trade command and displays it accordingly
Here is a complete walk through video:
1.15 Multiple alerts at once
You can send multiple alerts at once by putting them in square brackets and separate them by comma like this:
Example:
{"pair":"BTCUSD","units":500,"unitsType":"absolute","exchange":"Bybit","apiKey":"Key2","token":"your-token","isBuy":true,"isMarket":true,"leverage":"10"}]
1.16 For developers: Use TV-Hub's alert endpoint
You are a developer and you want to execute trades through TV-Hub? No problem, just send a POST request with the trade command in the body to the alert endpoint: https://alerts.tv-hub.org
Here is a postman example:

1.17 Binance Futures BNFCR Mode
TV-Hub supports the Binance Futures Credits Trading Mode (BNFCR Mode). This mode is only available to users in the EU under the MiCA regulation.
In this mode, available for USDⓈ-M contracts, PNL, margin, and fees will appear as BNFCR. Stablecoin balances (e.g., USDT, USDC, FDUSD) in your futures wallet can be converted to BNFCR at a 1:1 ratio. Transfers between futures wallets and other wallets are limited to BTC, ETH, and BNB. BNFCR cannot be directly withdrawn but must be converted to BTC, ETH, or BNB before withdrawal.
1.18 Demo trading
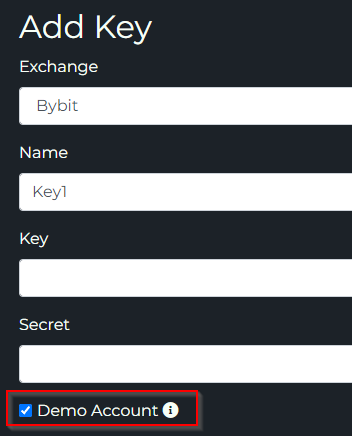
TV-Hub supports demo trading for Bybit and OKX. Simply create a demo API key and add it to TVHub by enabling the "Demo Account" checkbox.
This feature is ideal if you want to quickly test a strategy under real market conditions without risking you own funds. Unlike testnets, you will get actual market prices
2.A) Strategy Alerts
There are two ways to use strategy alerts with TV-Hub:
- 1.) For Pine Script Developers: If you are a Pine Script developer looking to integrate your custom strategy with TV-Hub.
- 2.) For Non-Developers: If you have no access or control over the strategy code but still want to use TV-Hub's automation features.
We have a video tutorial that covers both options in detail. Although the tutorial predates the release of our TradingView strategy template, it's still highly recommended for developers looking to integrate their strategies with TV-Hub. (See Chapter 2.1 for developer-specific details.)
2.1 TradingView Boilerplate / Template Strategy
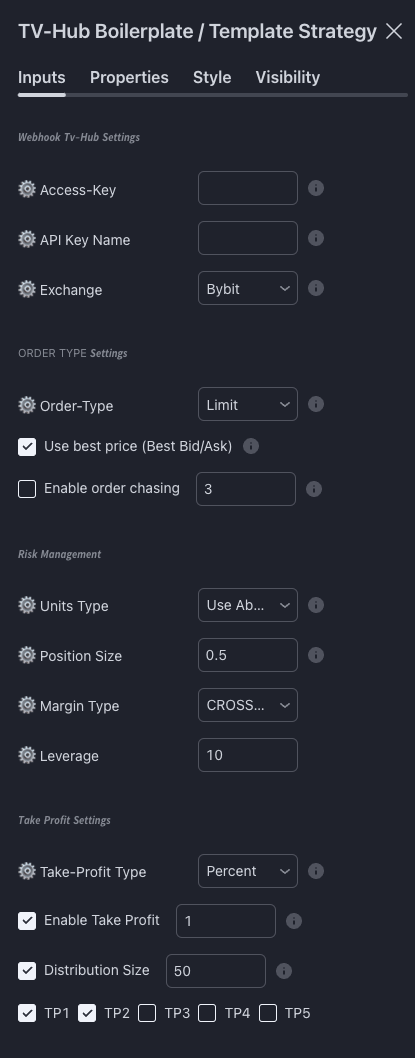
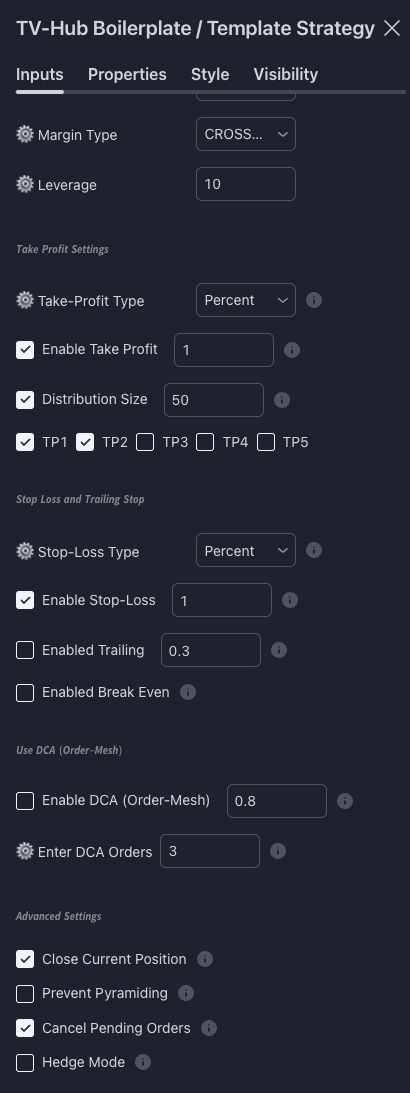
We provide a boilerplate strategy for TradingView PineScript developers to easily connect their trading strategies with TV-Hub. Simply integrate the TV-Hub input settings section into your existing strategy. The script automatically generates buy, sell, and close trade commands, which can be triggered via alerts.
View on GitHubThis makes it incredibly easy to enable a TradingView strategy to execute automated trades on your connected exchanges, making your strategy accessible to a wide range of traders. You'll get a customizable input interface like this:
2.2 Pine Code Integration
If you prefer not to use our input template and simply want an example of how to integrate trade commands you created using the command builder, you can use the following code:
sell_command = 'paste your sell command here'
close_command = 'paste your close command here'
// Make sure you use single quotes because the trade command contains double quotes
strategy.exit("Long SL/TP", from_entry="Long", loss=long_stoploss_percentage, profit=long_takeprofit_percentage, alert_message=close_command)
strategy.close("Long", when=sell_signal, alert_message=close_command)
strategy.exit("Short SL/TP", from_entry="Short", loss=short_stoploss_percentage, profit=short_takeprofit_percentage, alert_message=close_command)
strategy.close("Short", when=buy_signal, alert_message=close_command)
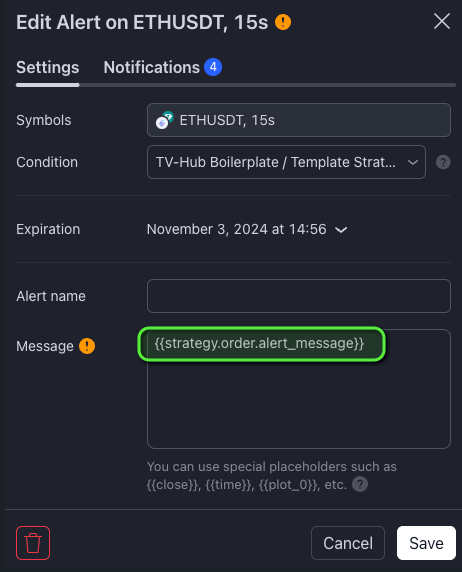
Once the commands are integrated, create an alert and use the {{strategy.order.alert_message}} variable to execute the trade, as shown below:
2.3 Strategy Alerts via TV-Hub
If you're not a developer or you're using a closed-source strategy without access to the Pine Script code, you can still enable strategy alerts directly through the command builder. TV-Hub will
automatically read the strategy.order.action variable to determine whether it's a long or short trade and will read the strategy.order.comment variable for close or exit signals.
Watch the video tutorial (See Chapter 2 ) for a more detailed walkthrough.

2.4 Close Position with a Strategy Alert
If you don't have control over the Pine Script code, you need to use the "Enable Strategy Alerts" option. TV-Hub will execute a close command if the value of the "strategyComment" variable contains the strings "exit" or "close".
However, sometimes the strategy developer uses a different value for "strategyComment", such as "Ex Short". In such cases, you can define this custom value using the "strategyCloseValue" variable within your trade command. When the "strategyComment" contains your specified value, TV-Hub will execute a close command. For example:
{"pair":"ETHUSD","units":50,"unitsType":"absolute","exchange":"Bitmex-Testnet","apiKey":"Key1","token":"your-token","isMarket":true,"leverage":"10","orderType":"{{strategy.order.action}}","strategyComment":"{{strategy.order.comment}}", "strategyCloseValue":"Ex Short"}
You can also define multiple "strategyCloseValue" values by using a separator character: |
{"pair":"ETHUSD","units":50,"unitsType":"absolute","exchange":"Bitmex-Testnet","apiKey":"Key1","token":"your-token","isMarket":true,"leverage":"10","orderType":"{{strategy.order.action}}","strategyComment":"{{strategy.order.comment}}", "strategyCloseValue":"Ex Short|TP|SL"}
2.B) Examples
2.1 Long (market)
Let's say we want to go immediately LONG on XBT with 100 contracts market order on 10x, a stop-loss of 5% and a take-profit of 10%.
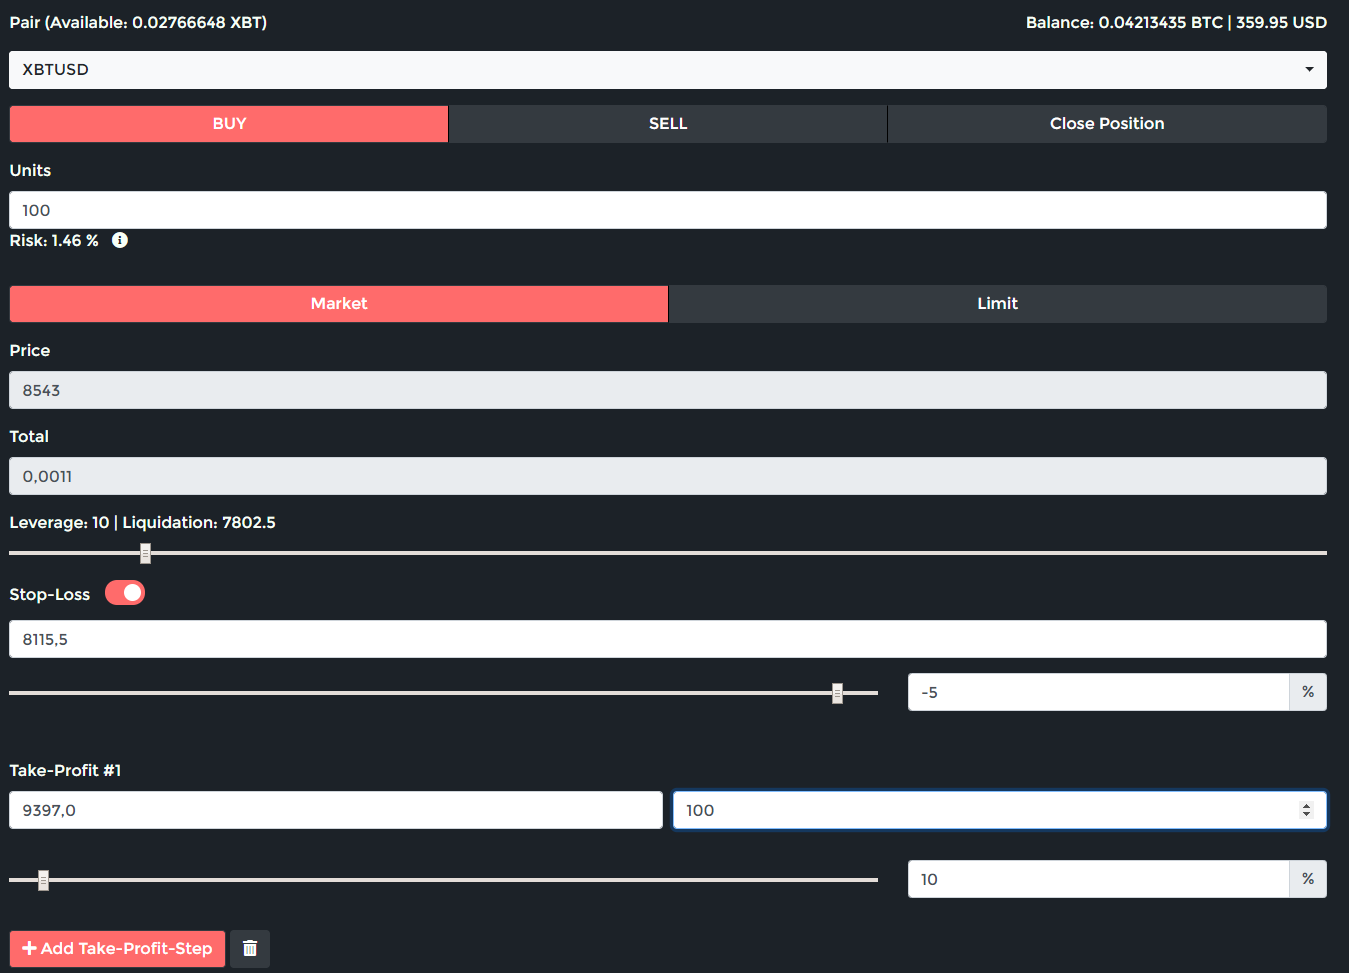
- Choose your trading pair: XBTUSD
- Choose BUY for a LONG position.
- Set the trade size. In this example 100
- Set order type to market
- The price is set automatically because it is a market order.
- Total shows you the value of the trade in XBT.
- Set the leverage to 10.
- Activate the stop-loss and set it to -5%. The exact value will be calculated. Or you choose a fixed value.
- Hit the button "Add Take-Profit-Step" and set it to 10%. The exact price will be calculated. Or you choose a fixed value. Then choose the take profit size. In this case 100.
- You can choose multiple profit targets by clicking the "Add Take-Profit-Step" button again.
Now the setup is finished and you can hit the "Generate" Button:

After that you can hit the "Copy" Button to copy the trade command to your clipboard:

The trade window should look like this:

Now you have to go to tradingview.com to setup the alert. Wherever you can create an alert at TV you are able to trigger this pre-build trade above. In this example we are using the BUY alters of the MarketGod Indicator.
Create an alert like this:

The create alter form looks like this:

- ) Choose your alert condition
- ) Choose the alert option. "Once Per Bar Close" is recommended to avoid indicator repainting. "Once Per Bar" could work for other conditions as well.
- ) Activate the checkbox "Webhook URL" and paste this URL: https://alerts.tv-hub.org
- ) Paste your alert message from above
- ) Hit the create button
2.2 Short (market)
Let's say we want to go immediately SHORT on XBT with 100 contracts market order on 10x, a stop-loss of 5% and a take-profit of 10%.
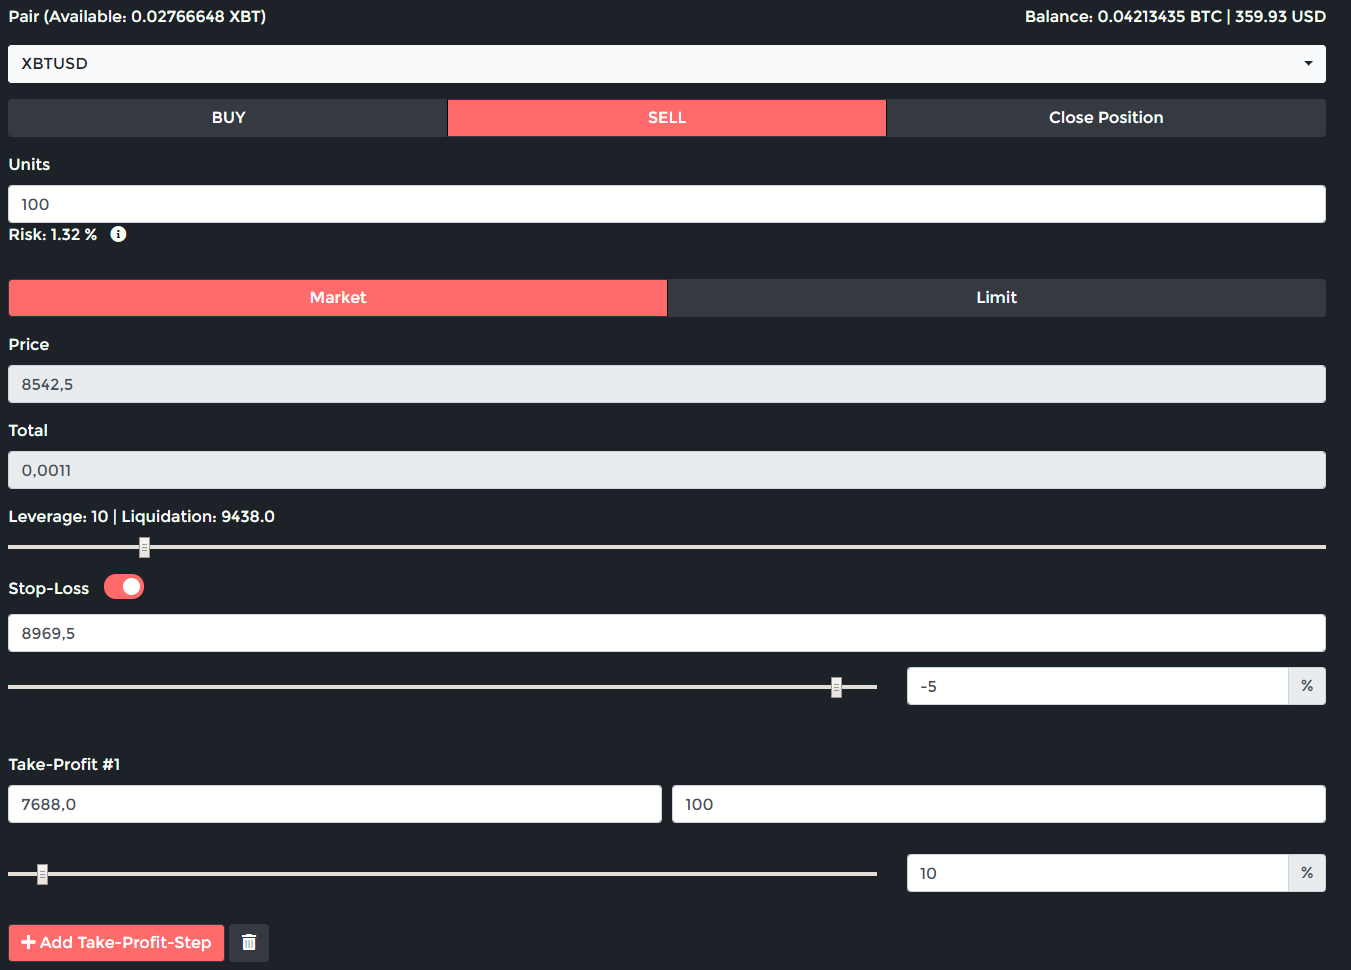
- Choose your trading pair: XBTUSD
- Choose SELL for a SHORT position.
- Set the trade size. In this example 100
- Set order type to market
- The price is set automatically because it is a market order.
- Total shows you the value of the trade in XBT.
- Set the leverage to 10.
- Activate the stop-loss and set it to -5%. The exact value will be calculated. Or you choose a fixed value.
- Hit the button "Add Take-Profit-Step" and set it to 10%. The exact price will be calculated. Or you choose a fixed value. Then choose the take profit size. In this case 100.
- You can choose multiple profit targets by clicking the "Add Take-Profit-Step" button again.
Now the setup is finished and you can hit the "Generate" Button:

After that you can hit the "Copy" Button to copy the trade command to your clipboard:

The trade window should look like this:

Now you have to go to tradingview.com to setup the alert. Wherever you can create an alert at TV you are able to trigger this pre-build trade above. In this example we are using the SELL alters of the MarketGod Indicator.
Create an alert like this:

The create alter form looks like this:
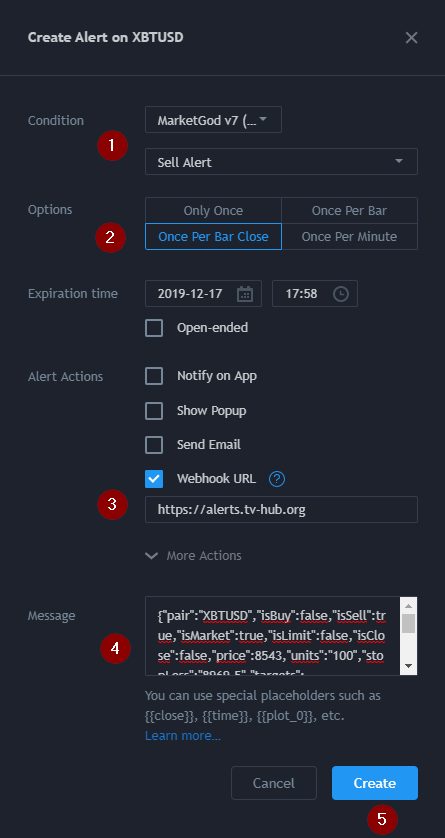
- ) Choose your alert condition
- ) Choose the alert option. "Once Per Bar Close" is recommended to avoid indicator repainting. "Once Per Bar" could work for other conditions as well.
- ) Activate the checkbox "Webhook URL" and paste this URL: https://alerts.tv-hub.org
- ) Paste your alert message from above
- ) Hit the create button
2.3 Binance - BUY (market)
Let's say if an alert occurs we want to BUY immediately 0.1 BTC with a market order, a stop-loss of 4% and a take-profit of 10%.

- Choose your trading pair: BTCUSDT
- Choose BUY.
- Set the trade size. In this example 0.1 BTC
- Set order type to market
- The price is set automatically because it is a market order.
- Total shows you the value of the trade in USDT.
- Activate the stop-loss and set it to -4%. The exact value will be calculated. Or you choose a fixed value.
- Hit the button "Add Take-Profit-Step" and set it to 10%. The exact price will be calculated. Or you choose a fixed value. Then choose the take profit size. In this case 0.1.
- You can choose multiple profit targets by clicking the "Add Take-Profit-Step" button again.
Now the setup is finished and you can hit the "Generate" Button:

After that you can hit the "Copy" Button to copy the trade command to your clipboard:

The trade window should look like this:

Now you have to go to tradingview.com to setup the alert. Wherever you can create an alert at TV you are able to trigger this pre-build trade above. In this example we are using the BUY alters of the MarketGod Indicator.
Create an alert like this:

The create alter form looks like this:

- ) Choose your alert condition
- ) Choose the alert option. "Once Per Bar Close" is recommended to avoid indicator repainting. "Once Per Bar" could work for other conditions as well.
- ) Activate the checkbox "Webhook URL" and paste this URL: https://alerts.tv-hub.org
- ) Paste your alert message from above
- ) Hit the create button
2.4 Binance - BUY (limit)
Assume if an alert occurs we want to BUY 0.15 BTC with a limit order.

- Choose your trading pair: BTCUSDT
- Choose BUY.
- Set the trade size. In this example 0.15 BTC
- Set order type to limit
- Choose the price you want to buy. In this example $8100.
- Total shows you the value of the trade in USDT.
Now the setup is finished and you can hit the "Generate" Button:

After that you can hit the "Copy" Button to copy the trade command to your clipboard:

The trade window should look like this:

Now you have to go to tradingview.com to setup the alert. Wherever you can create an alert at TV you are able to trigger this pre-build trade above. In this example we are using the BUY alters of the MarketGod Indicator.
Create an alert like this:

The create alter form looks like this:

- ) Choose your alert condition
- ) Choose the alert option. "Once Per Bar Close" is recommended to avoid indicator repainting. "Once Per Bar" could work for other conditions as well.
- ) Activate the checkbox "Webhook URL" and paste this URL: https://alerts.tv-hub.org
- ) Paste your alert message from above
- ) Hit the create button
Close position (For SL or TP)
This example shows how to use alerts to exit a position. It could be used as a stop-loss or a take-profit. If this signal is executed it will check if there is an open position (in this example BTCUSDT), it will remove all current limit SELL orders on this pair (OCO-, SL- or TP-orders) and execute a market SELL against the quote asset. In this case it will sell all BTC to USDT.

We use this BTCUSDT chart as an example. We are in a BTC position, the orange line is our stop-loss and the blue line our take-profit.

Set a stop-loss
Right click on the orange line and choose add alert:


- ) Choose the alert condition "Crossing Down"
- ) Choose the alert option. "Only Once".
- ) Activate the checkbox "Webhook URL" and paste this URL: https://alerts.tv-hub.org
- ) Paste your alert message from above
- ) Hit the create button
Set a take-profit
Right click on the blue line and choose add alert:


- ) Choose the alert condition "Crossing Up"
- ) Choose the alert option. "Only Once".
- ) Activate the checkbox "Webhook URL" and paste this URL: https://alerts.tv-hub.org
- ) Paste your alert message from above
- ) Hit the create button
2.6 Switch position (From long to short)
This example shows how to switch a position from long to short. Imagine we are in a long position with 1 BTC. With our next signal we want to sell our 1 BTC and open a short position of 1 BTC. Make sure you enable the checkbox "Close current position". This will check the current position size and add this to the order. In this example 1 BTC long + 1 BTC short = 2 BTC sell order. Of course this also works in the other direction from short to long.

Now your can hit create and setup the tradingview alert.
3. API Keys Setup
3.1 Bitmex
Log into your Bitmex account and open the account settings:

Open the API Keys:

Create an API key:
- choose a name for the API key. For example "tv-hub"
- Set the key permission to "order"
- If it's enabled: Confirm with your 2-FA key
- Hit Create API Key

Copy the created API key + secret:

Paste the API key + secret into your tv-hub settings:

Your options to use our service:
- Test-Period for each exchange: 7 days
- Use a subscription here
- Use our service for FREE by using our referral links:
1.) Create a Bitmex account with our referral link here
2.) Generate the API key & submit it here
3.) The system can automatically check if your api key is based on our referral link. If the key pass this check you see a green check mark instead of the expire date and you can use our service without limitations for free.
After you confirm with the save button the API key should appear in the table below:

Now your key is valid for 7 days or until the end of your subscription and you can start trading immediately. If you used our referral link for Bitmex you will see a green check mark and no expiration:

You can always delete your API keys with the trash icon and replace it with a new one.
3.2 Bitmex Testnet
Log into your Bitmex testnet account and open the account settings:

Open the API Keys:

Create an API key:
- choose a name for the API key. For example "tv-hub"
- Set the key permission to "order"
- If it's enabled: Confirm with your 2-FA key
- Hit Create API Key

Copy the created API key + secret:

Paste the API key + secret into your tv-hub settings:

After you confirm with the save button the API key should appear in the API key table.
You can always delete your API keys with the trash icon and replace it with a new one.

3.3 Binance
Log into your Binance account and open the account settings:

- choose a name for the API key. For example "tv-hub"
- Hit the create button
- If it's enabled: Confirm with your 2-FA key

Then you should see a email confirm page. Confirm the Binance mail by clicking the link.

After that you should see the new created key. Now it's time to edit the restrictions:
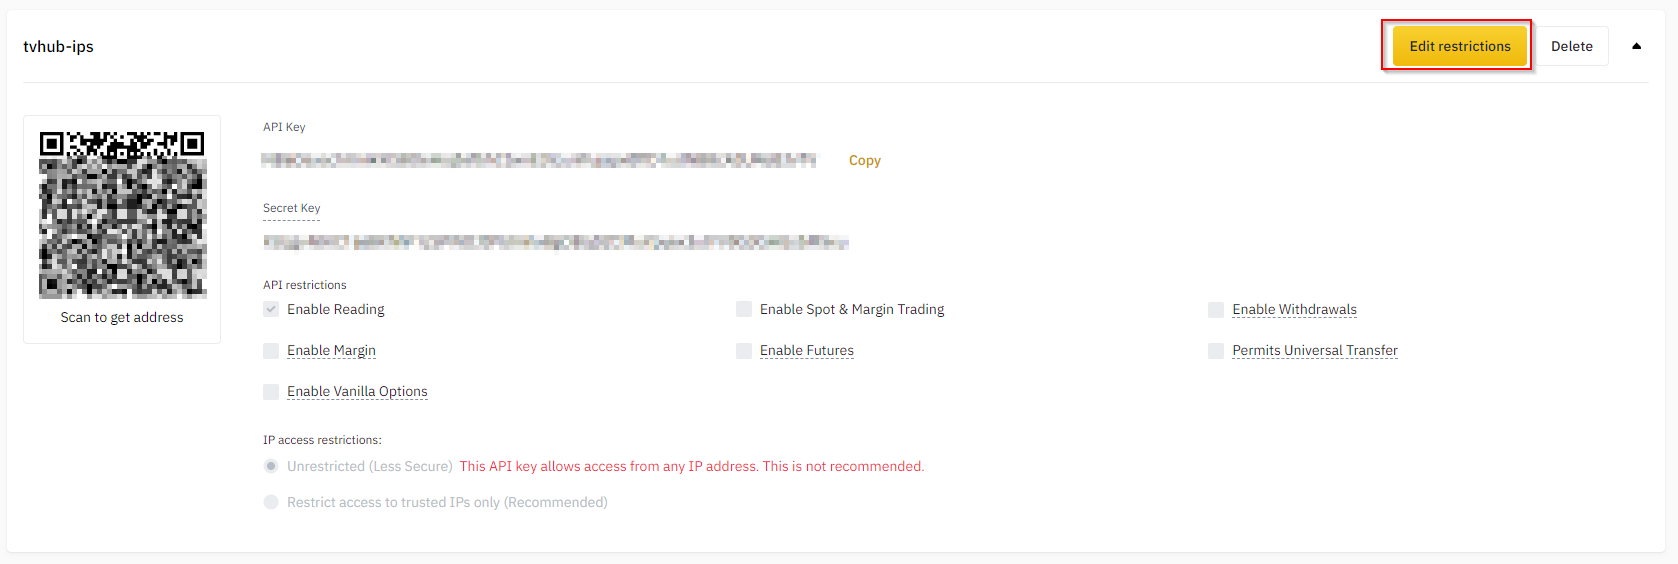
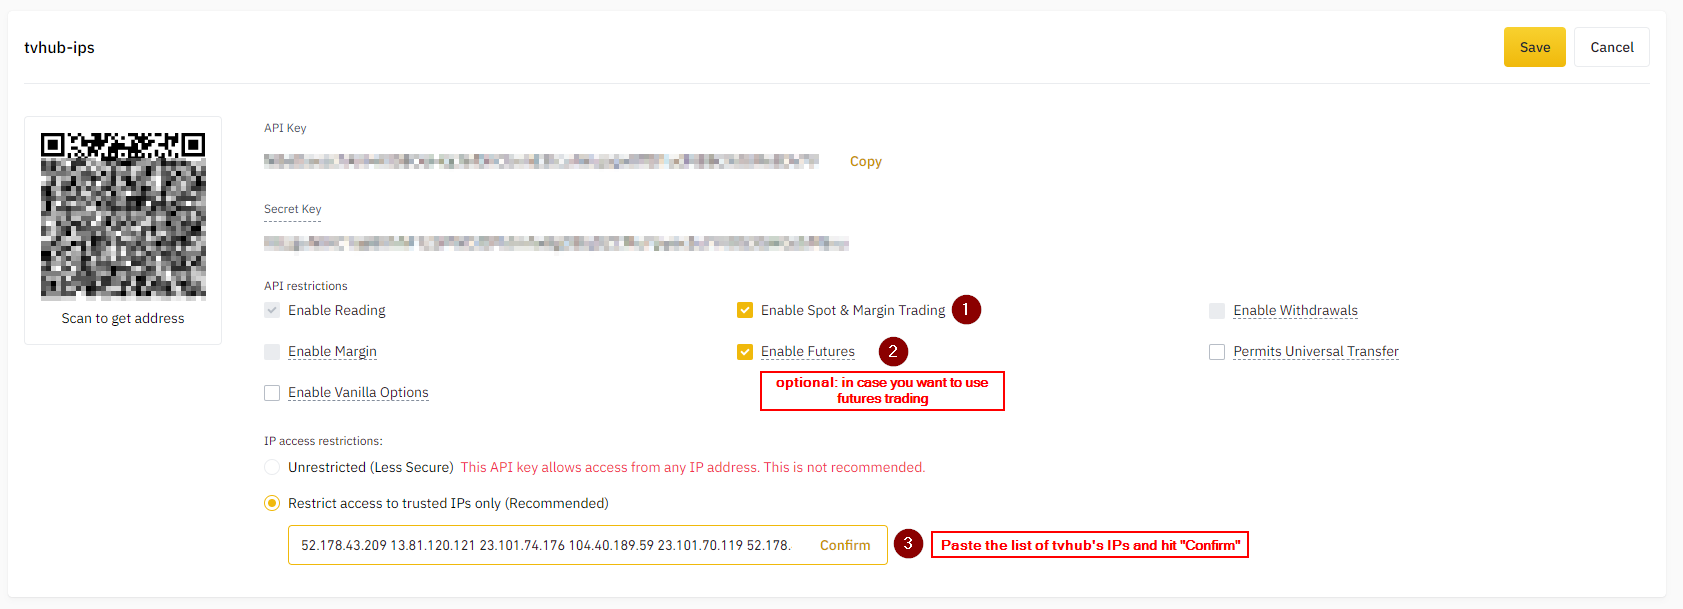
- Enable the checkbox Spot & Margin Trading
- Optional: enable futures trading
- To avoid that your API key expires bind it to our IP list. Copy & paste the tvhub IP list:
52.178.43.209 13.81.120.121 23.101.74.176 104.40.189.59 23.101.70.119 52.178.46.226 52.166.118.167 20.82.83.137 20.82.84.106 20.82.84.161 20.82.85.24 20.82.85.156 20.82.86.9 20.82.86.122 20.82.87.61 20.101.240.10 20.101.240.38 20.101.241.140 20.101.241.203 50.85.64.231 13.69.68.7 52.174.236.207 52.174.236.246 52.174.236.136 52.232.16.136 52.232.23.166 52.174.236.251 52.174.236.214
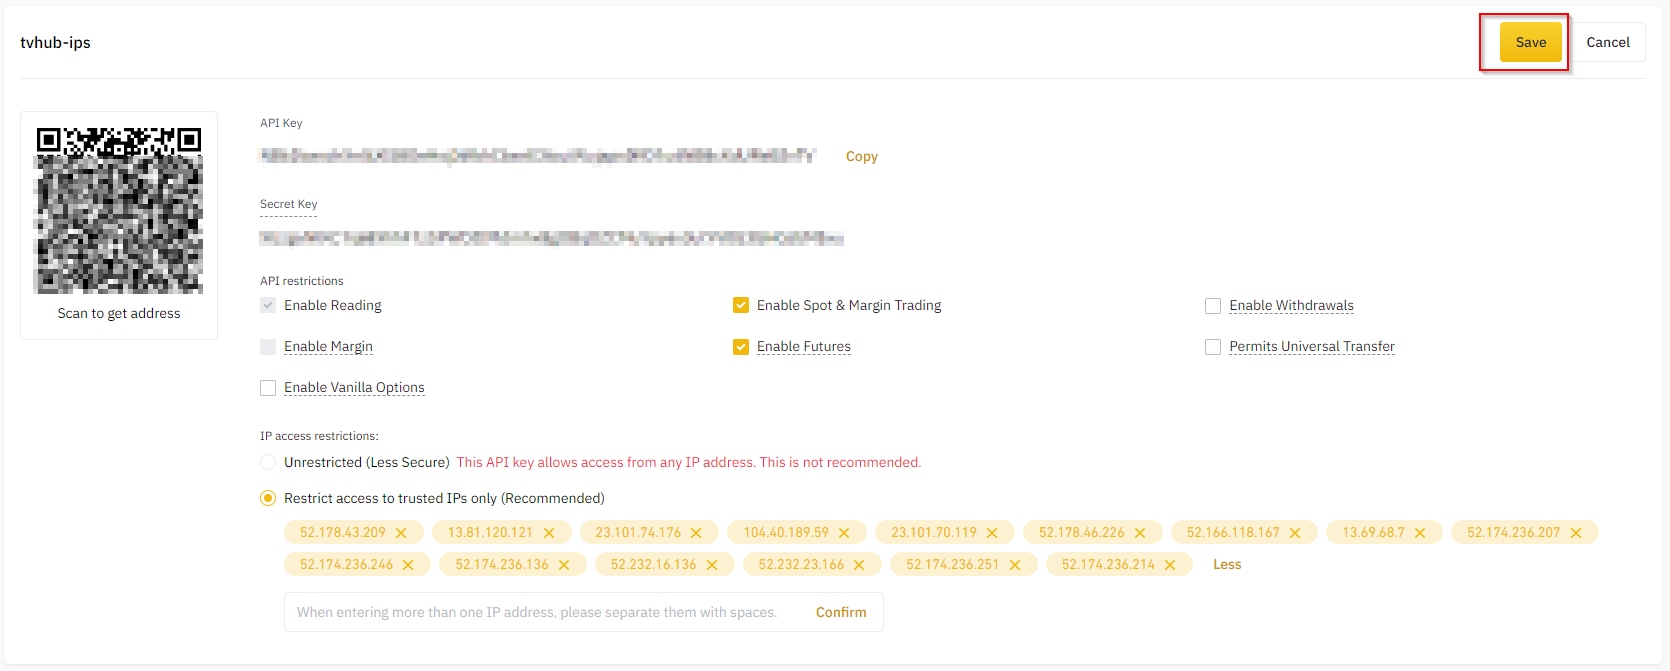
Hit the save button:
Now paste the API key + secret into your tv-hub settings:

Your options to use our service:
- Test-Period for each exchange: 7 days
- Use a subscription here
- Use our service for FREE by using our referral links:
1.) Create a binance account with our referral link here
2.) Generate the API key & submit the key together with your account UID (see screenshot below)
3.) We will review the provided UID & if it's part of our referral list we will approve the key and you can use it without expiration. As soon as the key is approved you see a green check mark instead of the expire date.
Remark: You can open new binance accounts without any issues. You don't have to do a new KYC. The only limitation you have in this case is the daily withdraw limit.
After you signed up you need to login into your profile settings, copy your UID and paste it here. We will review your provided UID and if you are part of our referrals you can use this key without expiration.

After you confirm with the save button the API key should appear in the table below:

Now your key is valid for 7 days or until the end of your subscription and you can start trading immediately. If you provided an user ID and we confirmed that (within the next few days). You will see a green check mark:

You can always delete your API keys with the trash icon and replace it with a new one.
3.4 Binance Futures
Log into your Binance account and open the account settings:

- Choose a name for the API key. For example "tvhub"
- Hit the create button
- If it's enabled: Confirm with your 2-FA key

Then you should see a email confirm page. Confirm the Binance mail by clicking the link.

After that you should see the new created key. Now it's time to edit the restrictions:

- Enable the checkbox Spot & Margin Trading
- Enable futures trading
- To avoid that your API key expires bind it to our IP list. Copy & paste the tvhub IP list:
20.194.185.150 20.191.169.179 20.191.172.69 20.48.71.250 20.191.172.206 20.191.173.63 20.191.174.156 20.191.175.88 20.78.104.150 20.78.105.3 20.78.105.95 20.78.105.134 20.78.105.150 20.191.175.195 20.78.105.154 20.78.105.162 20.78.105.172 20.78.105.244 20.78.106.67 20.78.106.119 20.78.106.130 20.48.71.143 20.78.106.137 20.78.106.149 20.78.106.151 20.191.173.152 20.78.106.157 20.78.106.166 20.46.190.72 20.78.106.172 20.43.67.38 13.69.68.7 52.174.236.207 52.174.236.246 52.174.236.136 52.232.16.136
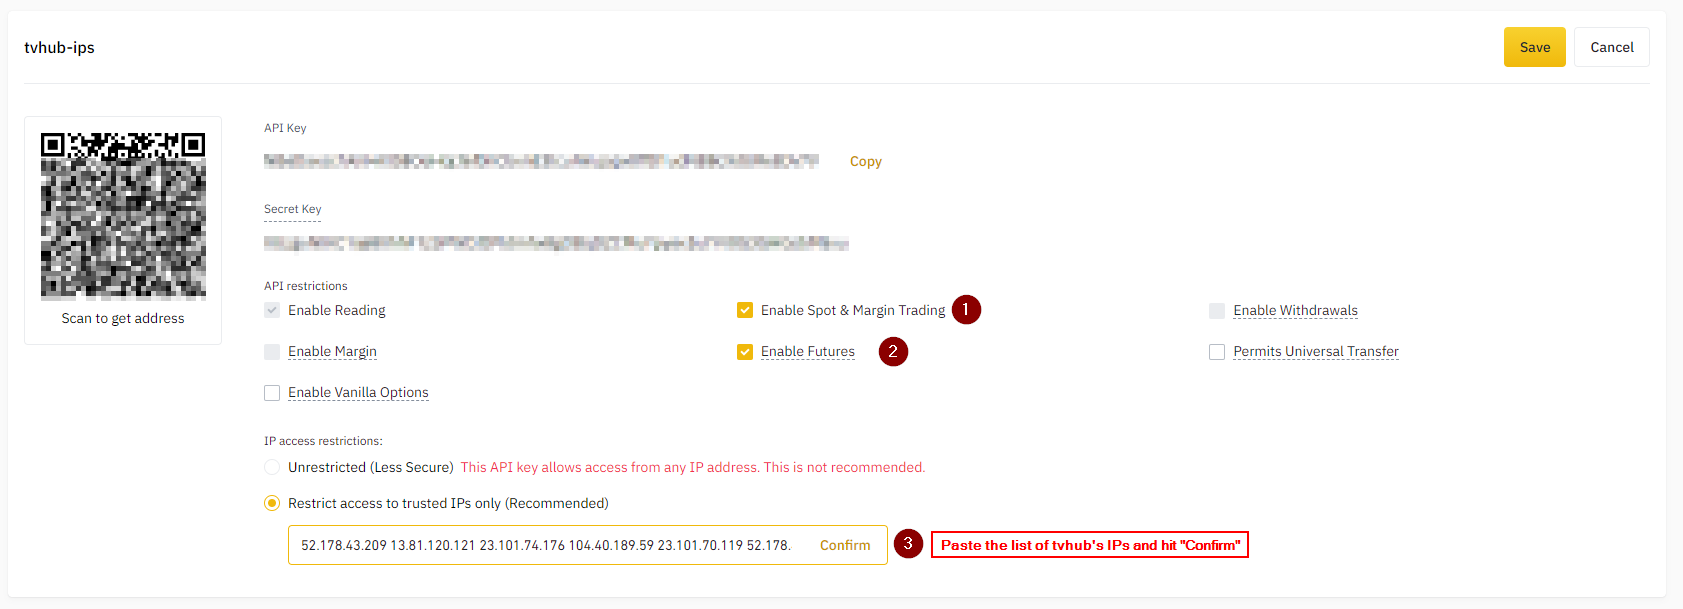
Hit the save button:

Paste the API key + secret into your tv-hub settings:

Your options to use our service:
- Test-Period for each exchange: 7 days
- Use a subscription here
- Use our service for FREE by using our referral links:
1.) Create a binance account with our referral link here
2.) Generate the API key & submit the key together with your account UID (see screenshot below)
3.) We will review the provided UID & if it's part of our referral list we will approve the key and you can use it without expiration. As soon as the key is approved you see a green check mark instead of the expire date.
Remark: You can open new binance accounts without any issues. You don't have to do a new KYC. The only limitation you have in this case is the daily withdraw limit.
After you signed up you need to login into your profile settings, copy your UID and paste it here. We will review your provided UID and if you are part of our referrals you can use this key without expiration.

After you confirm with the save button the API key should appear in the table below:

Now your key is valid for 7 days or until the end of your subscription and you can start trading immediately. If you provided an user ID and we confirmed that (within the next few days). You will see a green check mark:

You can always delete your API keys with the trash icon and replace it with a new one.
3.5 Binance Futures Testnet
Log into your Binance Futures Testnet account and open the API key section:

Paste the API key + secret into your tv-hub settings:

After you confirm with the save button the API key should appear in the table below:

You can always delete your API keys with the trash icon and replace it with a new one.
3.6 Bybit
Log into your Bybit account and open the API section:

On the next page:

- Click on API Management
- Create new key
On the next page:

- Click on System-generated API Keys
On the API key page:

- Choose "Connect to Third-Party Application"
- Choose "tv-hub.org"
- Set the API key permissions
- Click submit

- Pass the security check
- Hit Confirm
Paste the API key + secret into your tv-hub settings and hit save:

Your options to use our service:
- Test-Period for each exchange: 7 days
- Use a subscription here
- Use our service for FREE by using our referral links:
1.) Create a bybit account with our referral link here
2.) Generate the API key & submit it here
3.) The system can automatically check if your api key is based on our referral link. If the key pass this check you see a green check mark instead of the expire date and you can use our service without limitations for free.
4.) If you already have an existing Bybit account, you can create a new Bybit account with our ref-link and make a KYC transfer. Described here .
After you confirm with the save button the API key should appear in the table below:

Now your key is valid for 7 days or until the end of your subscription and you can start trading immediately. If you used our referral link for Bybit you will see a green check mark and no expiration:

You can always delete your API keys with the trash icon and replace it with a new one.
3.7 Bybit Testnet
Log into your Bybit account and open the Account & Security section:

On the next page:

- Click on API Management
- Create new key

- Choose a name for the API key. For example "tvhub"
- Select "Active Order and Positions" as the key permissions
- Enter your 2-FA code
- Hit Confirm
Now you will see your API key + secret.
Paste the API key + secret into your tv-hub settings and hit save:

You can always delete your API keys with the trash icon and replace it with a new one.
3.8 OKX
Log into your OKX account and open the API keys creation page here
Or from the top right menu:

1.) Select "Linking third-party apps"
2.) From the dropdown menu select "tv-hub.org"
2.) Give the key a name
4.) Enter a passphrase
5.) Set the permissions to "trade"

Then hit the button "Confirm"
Paste the API key + secret + the passphrase you set on OKX into your tv-hub settings:

Your options to use our service:
- Test-Period for each exchange: 7 days
- Use a subscription here
- Use our service for FREE by using our referral links:
1.) Create an OKX account with our referral link here
2.) Generate the API key & submit it here
3.) The system will read your UID and we will manually check it against our referral list. This may take a few days. But you can start right away because your key is immediately valid for 7 days.
4.) If we approved your API key you will see a green check mark next to it and no expiration date.
After you confirm with the save button the API key should appear in the table below:

Now your key is valid for 7 days or until the end of your subscription and you can start trading immediately. If you used our referral link we will approve your key (within the next few days). You will see a green check mark:

You can always delete your API keys with the trash icon and replace it with a new one.
3.9 Kucoin
To set up your KuCoin API key for use with TradingView Hub, follow these steps:
- Log into your KuCoin account (or create a new account) and navigate to the API Management section.
- Click on "Create API Key"
- On the API key creation page:
- Choose "Link Third-Party Applications"
- Select "tv-hub.org" from the drop-down list
- Give the key a name
- Set a passphrase
- Set the permissions to "Spot Trading" and/or "Futures Trading"
- Then click "Next"
- Complete the security verification process on the next page.
- Copy your API key and secret immediately as the secret will only be shown once.
- Enter the API key, secret and passphrase into TV-Hub's API key management page.
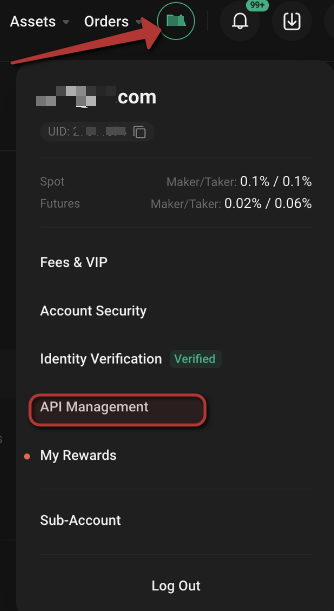

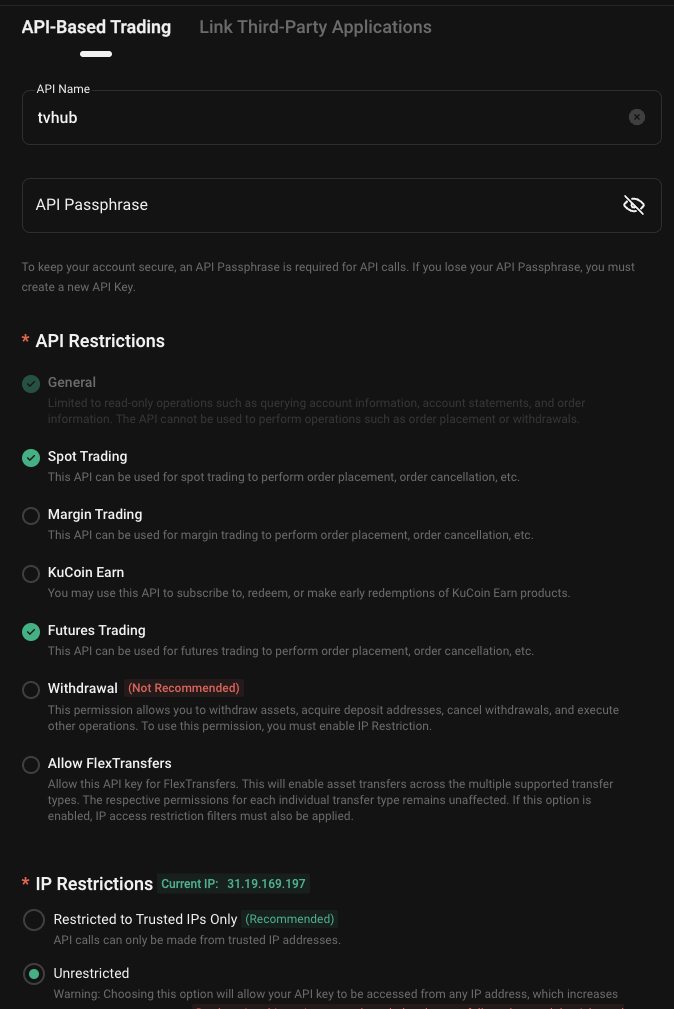
After saving, your API key will appear in your TV-Hub dashboard. You can start trading immediately.
You can always delete your API keys using the trash icon and replace them with new ones if needed.
3.10 Coinbase
To set up your Coinbase API key for use with TradingView Hub, follow these steps:
- Log into your Coinbase account (or create a new account) and navigate to settings in the top right corner:
- Click on "Create API Key":
- On the API key creation page:
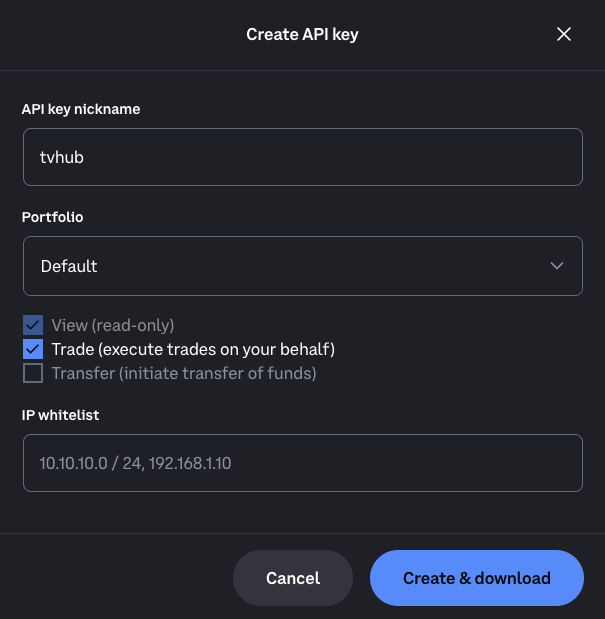
- Give the API key a name
- Select the portfolio
- Enable API Permissions "Trade"
- Optional: Whitelist TVHub's IP list
- Click "Create & Download"
- After successfully creating your API key, you will see both the API key and secret. A certificate file will also be automatically downloaded to your computer.
- Enter the API key and secret into the designated input fields. The value that starts with "organisation/..." is the API key. The secret is the one that starts with "-----BEGIN EC PRIVATE KEY-----". Copy the entire value and paste it into the secret input field. Then click "Save" to complete the process.
IP-Whitelist:
After saving, your API key will appear in the table below. It will be valid for 7 days or until the end of your subscription, allowing you to start trading immediately.
You can always delete your API keys using the trash icon and replace them with new ones.
4. Copy Trading
4.1 Introduction
The copy trading system allows you to share a signal (a TradingView alert) with:
- Your own account (private) to copy it between your different exchange accounts
- others (friends, communities) via an invitation
Everyone who follows the signal is able to set his own trade settings like trade-size or leverage.
4.2 Complete Walkthrough (Video Tutorial)
4.3 Create A Signal
1.) To create a new signal you need to go to the "Manage Signals" tab and click the button "Add signal"

2.) Then you need to:
- Give your signal a name
- Specify the supported pairs. This is just an info for others you can write what ever you want.
- Set the exchange where your signal is executed. You or others can copy the trade on a different exchange if they have the same trading pairs.
- You can provide a detailed info about your signal, provide external links, etc.

3.) Now your signal is created and initially only visible to you:

4.4 Follow A Signal
1.) To follow a signal, the first thing you need to do is to create a copy-trade. Go to "Signals" there you will find all of your own signals and all those shared with you. Click on the signal from which you want to create a copy trade.

2.) Now click the button "Create Copy Trade"

3.) And give the copy trade a name:

4.) After that you find your copy-trade under the tab "My Copy Trades".

5.) To enable the copy trade it's time to create the trade command which will be executed when a signal occurs. Go to the command builder of the exchange you want to use for your trade and activate the switch "Create copy-trade signal". Then you have to choose the signal source you want to use:

6.) You are now able to specify the following trade properties:
- The trade size. You can choose a fixed amount like 100 contracts or 0.1 BTC. Otherwise you can use a percent value of your available balance or your entire wallet balance.
- You can set your leverage (on futures exchanges)
- You can define a stop-loss. This is optional because it is possible that the signal source comes with a stop-loss. In this case you would override the base settings with your own stop-loss.
- You can define one or more take-profits. This is optional because it is possible that the signal source comes with take-profits. In this case you would override the base settings with your own take-profits.
7.) When you are done with the settings hit the button "Generate Copy-Trade"

8.) Back to the tab "My Copy Trades" you see that the trade is now enabled

9.) When you click the edit button you see the trade command which is executed when a copy trade occurs. With the enable switch you can always disable the copy-trade.

4.5 Share Signals
1.) You are able to share your signals with other people. To do so you need their email addresses and everyone you want to invite needs a TV-Hub account. Go to the tab "Manage Signals" and click the invitations link:

2.) Now click the button "Add User" and enter the email address of the person you want to invite. If you want to invite several at once you can submit multiple email addresses separated by comma.

3.) If the user was found he will be listed in the table below. You can always remove a user and he will no longer have access to your signal.

4.) The invited user will now find the signal under the tab "Signals". Now he can create a copy-trade like described in chapter 4.4 Follow A Signal:

4.6 Broadcast A Signal
1.) After you created a signal ( 4.3 Create A Signal), created the copy-trade ( 4.4 Follow A Signal) and / or invited other traders to your signal ( 4.5 Share Signals) it's time to build the main trade command which is broadcasted to all followers. Go to the command builder of the exchange you want to use for your trade and activate the switch "Broadcast Trade". Then choose the signal source for the broadcast:

2.) Now define all trade parameters like training-pair, trade-size, trade-direction (buy, sell, close), etc. You can use every option TV-Hub offers. Everything will be broadcasted to the followers. They are able to override some of the trade settings (trade-size. leverage, etc.) with their own settings and follow the signal. When you are done with the customization of the main signal hit the "Generate" button, copy the trade command and paste it in the TradingView alert message.

6. Activity Log
The activity log shows all trade activities. It logs every trade and informs about warnings and errors.

6.1 Filtering
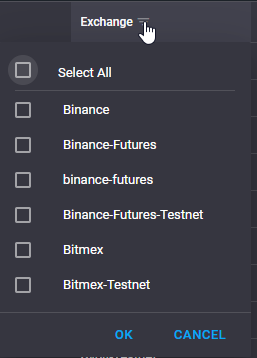
You are able to filter each column. For example the exchange column:
If you want to see the trade command which triggers the trade you can include this into the filter expression, because by default these commands are not shown:
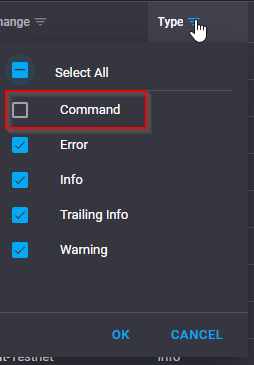
Now it will show the trade command like this:

6.2 Sorting
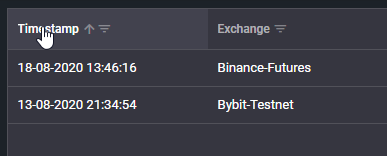
By clicking on the column header you can change the sort direction:
