TradingView Alerts Setup: Free Plan Limits (2026)
Quick Summary
If you're automating a TradingView strategy for real, you need a paid plan. Webhook alerts, the piece that turns a signal into an executed trade, start with the Essential tier, and so do technical (indicator and strategy) alerts. The more strategies you run and the more they lean on indicators, the more that paid tier earns its place. As of July 2026 the free plan caps you at 3 active price alerts and 0 technical alerts with no webhooks, which is fine for a single price-level trigger through TV-Hub email signals but not for the strategy automation most people come here to build.
TV-Hub is the execution layer between TradingView and your exchange, whether you built the strategy yourself, grabbed one of the many free ones out there, or bought it. The bot itself is free through an exchange referral link and demo trading is always free, so a TradingView subscription is the only fixed cost you can't route around.
If you build automated strategies on TradingView, the alert is the trigger that turns your logic into a live order. Get it right and a bridge like TV-Hub executes it on your exchange in seconds. Get the plan wrong and the alert never leaves TradingView. That's the catch most guides skip: webhook alerts, the ones that actually drive automation, need a paid plan, and as of July 2026 the free plan gives you 3 active price alerts and 0 technical alerts with no webhooks.
This guide is written for traders who already know what automation is and want to run their own, free, or purchased strategies without babysitting a screen. It covers every alert type, how to build your first one, and how a webhook alert becomes an executed trade. We start with the plans, because that choice shapes everything else and forms the base of any crypto trading automation setup.
How Many TradingView Alerts Do You Get on Each Plan? (2026)
As of July 2026, the TradingView free plan includes 3 active price alerts, 0 technical alerts, and no webhook notifications. The paid tiers (Essential, Plus, Premium, and Ultimate) raise the alert limit as you move up, and both technical alerts and webhooks unlock starting at Essential. Exact per-tier counts change, so confirm the current numbers on TradingView's pricing page (verified July 2026).
One thing worth being clear about: the free plan's 3-alert cap applies to price alerts only. Indicator, strategy, and drawing alerts count as technical alerts, and the free plan gives you 0 of those, so any Pine Script or indicator-driven alert requires a paid tier.
| Plan | Active Price Alerts | Technical Alerts | Webhook Alerts | Email Delivery | Automation Possible |
|---|---|---|---|---|---|
| Free | 3 (July 2026) | 0 | No | Yes | Price alerts only, via email |
| Essential | More (see TradingView) | Yes | Yes | Yes | Full |
| Plus | More (see TradingView) | Yes | Yes | Yes | Full |
| Premium | More (see TradingView) | Yes | Yes | Yes | Full |
| Ultimate | Highest (see TradingView) | Yes | Yes | Yes | Full |

What the free plan does not give you is technical alerts. Indicator, strategy, and drawing alerts all count as technical alerts, and a Basic account has a limit of 0 of them. So price levels are the only thing you can alert on for free. TradingView shows this directly when you try to create one.

The good news, and the part most guides get wrong, is that the free plan can still deliver those 3 price alerts to an alternative email address. That gives you a real, if narrow, route to automation. We cover exactly how it works in the next section.
Can You Automate Trading on the TradingView Free Plan?
Yes, but only within tight limits. The TradingView free plan includes 3 active price alerts and 0 technical alerts, so you can automate simple price-level entries by sending those price alerts to TV-Hub as email signals. We verified this in July 2026 by placing a live trade through TV-Hub from a Basic account, triggered by an email signal. What you can't do on the free plan is run indicator or strategy automation: technical alerts and webhooks both start with the paid Essential plan (TradingView Help, 2026).
Two things shape what free-plan automation can do. First, only price alerts exist on Basic, so any indicator, Pine Script, or strategy signal is off the table until you upgrade. Second, email signals are slower than webhooks, arriving in seconds rather than under a second, which suits position entries more than fast scalps. Webhooks stay the recommended route for anyone serious about automation, and they start on the Essential plan.
The real cost of automation
Here's the part that surprises people. TradingView's own subscription is the only fixed cost in the stack, and every webhook bot platform requires it. The bot on top is where you can save.
The TV-Hub bot is free when you connect an exchange through our referral link, including Bybit, Binance, OKX, BitMEX, and KuCoin. Demo and paper trading are always free, with no subscription at all. Without a referral, TV-Hub starts at $23 per month, with discounts on longer terms. The same paid pricing applies on Coinbase Advanced, which isn't part of the free-referral model.
Disclosure: we earn a referral commission when you sign up through an exchange link. The bot stays free for you either way.

Not sure which exchange to start on? Our step-by-step walkthroughs for connecting Bybit to TradingView and connecting Binance to TradingView cover the whole flow, and the Bybit webhook connection guide shows the exact API key settings.
Automate on a Free Demo, Then Go Live
Connect an exchange through a referral link and the TV-Hub bot is free. Demo trading needs no subscription at all, so you can test the full pipeline before spending a cent.
Start Free Trial View DocumentationWhat Are TradingView Alerts and Why Do They Matter?
TradingView alerts are automated notifications that fire the moment a condition you define is met, delivered by app, email, or webhook. They matter because crypto trades 24 hours a day, 7 days a week, against the roughly 32.5 weekly hours a stock market like the NYSE is open (2026). Alerts cover the hours you can't.
The condition can be a price level, an indicator reading, a volume spike, or a custom Pine Script rule. You set it once, and TradingView watches the chart so you don't have to stare at it waiting for a level to break.
They also take the emotion out of the moment. When you watch a chart live, fear and greed tend to override the plan. An alert fires on the rule you wrote earlier, when you were calm, not on the feeling you have when price is moving fast.
And when an alert is wired to a webhook, execution happens in under a second. A manual trader sees the signal, thinks, and clicks, and the best entry is often gone by then. A bot acts the instant the condition triggers.
Which Alert Types Work Best for Crypto Trading?
TradingView alerts fall into three practical groups: price-based, indicator-based, and custom Pine Script conditions (2026). Price alerts are the simplest and cover most crypto trading. Indicator alerts add momentum and trend signals. Pine Script alerts combine any number of conditions into one rule. Pick the type that matches your strategy, not the most complex one.
Price-Based Alerts
Price-based alerts trigger when an asset reaches a level or moves by a set percentage. These are the simplest and often the most effective for crypto.
Support and resistance alerts notify you when price touches a key level. For example, an alert when Bitcoin drops to $40,000 (support) or breaks above $45,000 (resistance). Percentage-change alerts fire when an asset moves up or down by a set amount, which is handy for catching momentum or sharp reversals. Moving-average alerts fire when price crosses an average like the 50-day or 200-day, flagging trend changes early.
Technical Indicator Alerts
Indicator alerts watch oscillators and momentum tools for entries and exits. RSI alerts trigger on overbought (above 70) or oversold (below 30) readings. MACD alerts watch for bullish and bearish crossovers, which often lead price. Volume alerts fire when volume spikes above normal, and unusual volume frequently comes before a big move.
Custom Strategy Alerts
Custom alerts use Pine Script, TradingView's own language, to combine several conditions into one signal (Pine Script v6 docs). You might require RSI oversold AND price above the 200-day average AND above-average volume before anything fires. Requiring several confirmations filters out false signals and raises your win rate while cutting alert noise.

| Alert Type | Complexity | Setup Time | Best For | Effectiveness |
|---|---|---|---|---|
| Price-Based | Low | 5 minutes | Support/Resistance, Breakouts | High |
| Percentage Change | Low | 3 minutes | Momentum Trading, News Events | Medium |
| Moving Average | Medium | 10 minutes | Trend Following | High |
| RSI/MACD | Medium | 15 minutes | Reversal Trading | Medium |
| Volume Alerts | Medium | 10 minutes | Early Trend Detection | High |
| Custom Strategy | High | 30+ minutes | Complex Strategies | Very High |
Setup times and effectiveness ratings are typical estimates from our own testing, not guarantees. Your results depend on your strategy and market conditions.
How to Set Up Your First TradingView Alert
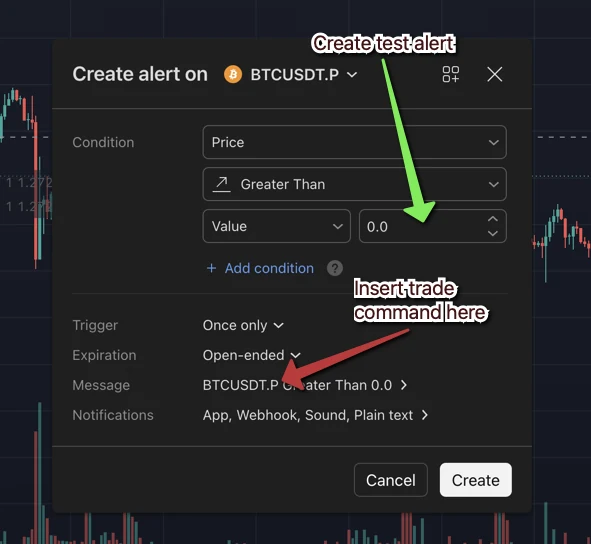
To create an alert, open a chart, click the bell icon (or right-click and choose "Add Alert"), set your condition, pick how often it triggers, write the message, and choose a delivery method. Free accounts can create alerts, but only 3 active price alerts at once, no technical (indicator or strategy) alerts, and no webhook delivery (July 2026). They can still deliver those price alerts by email. Paid tiers raise the limit and add technical alerts and webhook notifications.
Step 1: Navigate to Alert Creation
Open any chart and click the alert icon (the bell) in the toolbar, or right-click the chart and choose "Add Alert." Either opens the alert creation dialog.
Step 2: Set Your Trigger Conditions
The condition dropdown decides what fires the alert. Beginners should start with "Crossing." Pick your asset (like BTC/USD), choose "Crossing," and set it above or below a price. Set Bitcoin to cross above $42,000 to catch a breakout, or below $40,000 to buy a dip.
Step 3: Configure Alert Settings
Choose how often it can trigger. "Once Per Bar Close" prevents spam during volatile periods. "Only Once" fires a single time then deletes itself, which suits one-off events like breaking resistance. Set an expiration too; most traders use 30 to 90 days to keep the list current.
Step 4: Customize Your Alert Message
The message is what you receive when the alert fires. Include the asset, the condition, and your intended action, for example: "BTC broke above $42,000 resistance. Consider long entry with stop at $41,500." For automated trading, you'll use a specific JSON format that your bot understands, which we cover in the webhook section.
Step 5: Select Notification Method
Pick how to receive the alert. Email works for most people, push notifications through the mobile app are faster, and webhooks are the choice for automation. Click "Create" and the alert goes live immediately. You can view, edit, or delete every alert from the alert panel (the bell icon) at any time.

Webhook Integration for Automated Trading
A webhook is the bridge between a TradingView signal and an executed trade. When a webhook alert fires, TradingView sends an HTTP POST request to a URL you set, carrying your custom message, and your bot places the order in seconds. Webhooks require a paid plan starting at Essential plus account two-factor authentication (TradingView Help, 2026), so they are not available on the free plan.
How webhook alerts differ from standard alerts
A standard alert tells you about a market condition. A webhook alert acts on it. Instead of you reading a notification and clicking, the request goes straight to your bot, which can open, adjust, or close a position without any manual step.
Setting up the webhook URL
You need an endpoint that receives and processes TradingView's data. That can be your own server, a cloud function, or a service like TV-Hub built for TradingView webhooks. In the alert dialog, open the Notifications tab and find the "Webhook URL" field (available from the Essential plan and up). Paste your endpoint URL there, and TradingView sends every trigger to that address. For a field-by-field breakdown of the payload, see our TradingView webhook format guide.

Security considerations
Always use HTTPS so the data is encrypted in transit. Put an authentication token in the URL or the message payload so nobody else can post to your endpoint. If your server supports it, restrict inbound requests to TradingView's published IP ranges. Never place raw API keys in a webhook URL; keep credentials in secure storage on the receiving side.
Testing webhook connectivity
Before going live, test with a demo account or tiny position sizes and watch your logs to confirm messages arrive and parse. The screenshot below shows real trades that a TV-Hub user executed on Bybit from TradingView webhook alerts, which is the outcome you're aiming for.
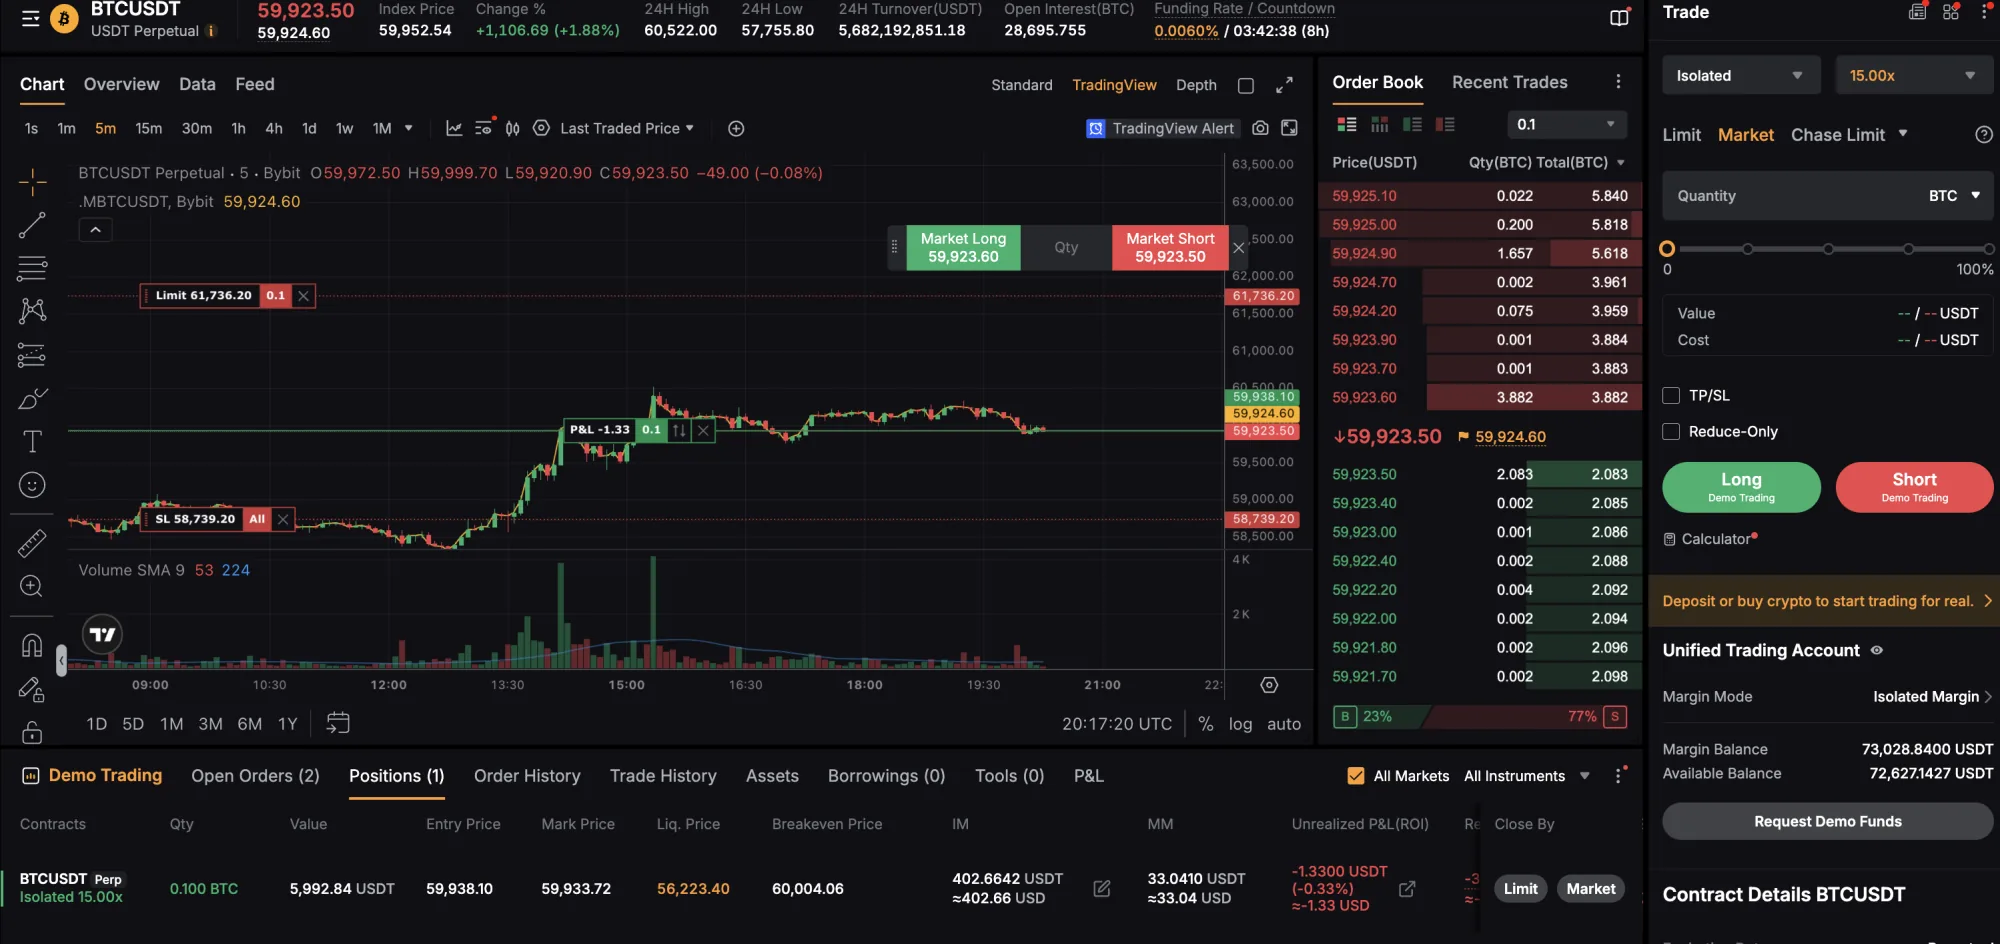
Webhook alerts open up serious automation. Paired with proper risk management and a full automation setup, they can run sophisticated strategies with very little hands-on work.
Email Alerts: Free-Plan Automation and a Paid-Plan Backup
Email signals do two jobs, depending on your plan. On the free plan, they're the only automation route you have: deliver a price alert to an alternative email address, TV-Hub reads it, and the trade fires. On a paid plan, where webhooks handle the primary path, email becomes a reliability backup so a trade still executes if a webhook is dropped in transit. TV-Hub reads whichever arrives first and ignores the duplicate.
Either way, email is slower than a webhook, arriving in seconds rather than under a second, so it fits price-level entries better than fast scalps. If you're on Essential or higher, run webhooks as the primary path and keep email as the fallback. If you're on the free plan, email is what makes price-level automation possible at all. The email backup documentation walks through enabling it alongside a webhook.
For high-stakes entries, this redundancy is worth it. Missing a signal usually costs more than a few seconds of delay on the rare occasion the backup has to step in.
What Advanced Techniques Improve Alert Accuracy?
Three techniques sharpen accuracy once basic alerts feel comfortable: multi-timeframe confirmation, conditional AND/OR logic, and clean JSON message formatting for automation. A single Pine Script alert can pull data from several timeframes at once (Pine Script v6 docs, 2026), so you can check the weekly trend before acting on an hourly signal. Each technique cuts noise.
Multi-Timeframe Alert Strategies
The best signals hold up across timeframes. A bullish setup on the 1-hour can sit inside a daily downtrend, and that conflict is where losses come from. Build alerts that require both: only trigger a buy when the 1-hour RSI is oversold AND the daily trend is up (price above the 50-day average). Pine Script can reference multiple timeframes in a single alert, so you can check the weekly trend before acting on an hourly signal.
Conditional Alert Logic
AND logic requires every condition to be true, which is more selective and cuts false signals. OR logic fires when any condition is met, which catches more setups but raises false positives. An AND example: trigger only when RSI < 30 AND price > 200-day MA AND volume > 20-day average, giving you oversold conditions inside an uptrend with volume behind them.
Alert Message Templates for Automation
For automated trading, message format matters. Bots need predictable structure to place orders correctly, and JSON works best:
{
  "token": "YOUR_TOKEN",
  "exchange": "binance",
  "pair": "BTCUSDT",
  "apiKey": "BinanceKey1",
  "isBuy": true,
  "isMarket": true,
  "unitsType": "percent",
  "unitsPercent": 1
}
Those field names are the ones TV-Hub actually reads: token and apiKey authenticate the request, exchange and pair route the order, isBuy and isMarket set direction and type, and unitsType with unitsPercent size it. TradingView placeholders fill in dynamic values: use {{ticker}} for the pair and {{timenow}} in an alertTimestamp so a repeated signal is never dropped as a duplicate.
| Message Element | Purpose | Example |
|---|---|---|
| token / apiKey | Your TV-Hub webhook token, plus the label of the stored exchange key to trade on | "YOUR_TOKEN", "BinanceKey1" |
| exchange | Which exchange places the order | "binance", "bybit", "binance-futures" |
| pair | The trading pair | "BTCUSDT", "ETHUSDT" |
| isBuy / isSell / isClose | Order direction | true |
| isMarket / isLimit | Order type | true |
| unitsType + unitsPercent | Position size, as a percent of balance or fixed units | "percent", 1 |
| stopLossPercent / targets | Optional stop loss and a take-profit ladder | 1.5, [0.8, 1.6] |
How Should You Organize Your TradingView Alerts?
Whether you are working within the 3 active price alerts on the free plan (July 2026) or a larger paid allowance, organization keeps the signals that matter from getting buried (TradingView pricing). The fix is a consistent naming system, sensible grouping, and a regular review to prune what no longer works. A little structure keeps the important alerts visible.
Creating an Effective Alert Naming System
Settle on a naming convention before the list gets long. Include the asset, timeframe, strategy, and condition in every name:
- "BTC-1H-RSI-Oversold-Long"
- "ETH-Daily-MA-Golden-Cross"
- "LINK-4H-Support-Break-Short"
Names like these let you scan and filter by asset or strategy at a glance. Avoid generic labels like "BTC Alert" that tell you nothing.
Organizing Alerts by Strategy or Timeframe
TradingView has no folders, but consistent naming creates natural groups when alerts sort alphabetically. If you run very different approaches, separate accounts can keep scalping alerts away from swing alerts and cut confusion in fast markets.
Alert Portfolio Management
Treat alerts like a portfolio. Track which ones lead to profitable trades and which produce losses, and keep records of their performance. Market conditions shift, so review conditions regularly and pause or adjust anything that stops working rather than letting it rack up losses. More alerts is not better; too many signals cause analysis paralysis and extra trading costs.
| Organization Method | Pros | Cons | Best For |
|---|---|---|---|
| Strategy-Based | Clear signal logic | May miss correlations | Focused traders |
| Timeframe-Based | Easy time management | Strategy confusion | Multi-timeframe traders |
| Asset-Based | Sector focus | Missed opportunities | Specialized traders |
| Performance-Based | Profit optimization | Constantly changing | Data-driven traders |
What Are the Most Common Alert Setup Mistakes?
Most alert failures trace back to a handful of mistakes: over-alerting, time-zone confusion, and malformed webhook messages. The good news is each one has a clear fix, and when a trade does fail, TV-Hub gives you a place to see exactly why.
Frequency and Timing Errors
Over-alerting is the classic beginner error. Setting "Any Bar Close" during a volatile stretch can flood you with dozens of signals an hour, drowning the ones that matter. Use "Once Per Bar Close" for most alerts and "Only Once" for big events like a major level breaking.
Time-zone confusion causes missed alerts too. TradingView defaults to exchange time zones, so an alert set for "market open" can fire while you're asleep. Set your local time zone in settings, or use UTC, and think about when you'll actually be available before choosing trigger times.
Message Formatting Issues
Webhook alerts fail when the message doesn't match what your bot expects. A missing quote, an extra comma, or the wrong variable name can stop a trade. Test messages with a demo account or small size first, validate the JSON, and keep templates simple. Watch out for variable slips too, like using {{price}} instead of {{close}}.
When a Trade Fails: Where to Look
Here's the honest mechanics of it. When a trade fails, TV-Hub records it as an entry in your Activity Log. TradingView does not get a usable status code back from the exchange, so the Activity Log is your source of truth for debugging, not the TradingView alert history.

Match the error to the fix with our guide to debugging a failed trade alert. For broader pitfalls around risk and position sizing, see the common automated trading mistakes guide.
How Should You Configure Alerts for Each Strategy?
Match the alert to the trading style. Scalping runs on 1 to 5 minute charts with minimal conditions for speed, swing trading uses 4-hour to daily charts with layered confirmations, and DCA fires on percentage drops like -5%, -10%, and -15% from recent highs. A scalping alert handed to a swing trader tends to underperform, and the reverse is just as true.
Scalping Strategy Alerts
Scalping needs fast execution on small moves. Use short timeframes (1 to 5 minutes) with tight conditions, and favor simple price crosses over indicator alerts, which lag. Keep conditions minimal so the alert fires and executes quickly. Our guide to crypto scalping bots digs into the execution speed and fee math that decide whether a scalping strategy actually works.
Swing Trading Alerts
Swing trading gives you time to analyze, so you can layer confirmations to cut false signals. Use 4-hour or daily timeframes with trend and momentum indicators, and require several conditions before triggering. Include stop-loss levels in the alert message, since you won't be watching positions all day.
DCA (Dollar Cost Averaging) Alerts
DCA runs on time and volatility, not classic technical signals. Set percentage-drop alerts at intervals (-5%, -10%, -15% from recent highs) to add on the way down, and use time-based alerts for regular scheduled buys. Combine both to buy your set amount on schedule and add extra during real dips.
| Strategy | Timeframe | Alert Frequency | Complexity | Key Metrics |
|---|---|---|---|---|
| Scalping | 1-5 minutes | High (20+ daily) | Low | Speed, Low latency |
| Day Trading | 15-60 minutes | Medium (5-15 daily) | Medium | Accuracy, Volume |
| Swing Trading | 4H-Daily | Low (1-5 weekly) | High | Win rate, R:R ratio |
| DCA | Weekly-Monthly | Very Low (1-4 monthly) | Low | Cost averaging |
Testing and Backtesting Your Alert Strategies
Never run alerts with real money before testing them. Strategies that look great on paper stumble on slippage, latency, and market behavior that backtests smooth over. Paper trade for at least 30 to 60 days, then backtest on historical data with TradingView's Strategy Tester (Pine Script v6 docs, 2026). Demo trading on TV-Hub is free, so there's no cost to being careful.
Paper Trading with Alerts
Start every new strategy in paper trading. TradingView's paper trading integrates with alerts and executes simulated trades when they fire, including simulated slippage and delay. Run it for at least 30 to 60 days so you see different market conditions, and track drawdown and win rate, not just profit. Our quickstart wires a Bybit demo account to TradingView in about five minutes, so you can test the real webhook path with no money at risk.
Using TradingView's Strategy Tester
The Strategy Tester backtests Pine Script strategies on historical data, showing how your conditions would have performed. Past results don't guarantee future ones, but backtesting surfaces obvious flaws. Test out of sample: if you tuned conditions on 2025 data, check them on 2024 data, and pay attention to crashes, pumps, and low-volume periods.
Historical Alert Performance Analysis
Keep records of every alert that fires, with date, time, conditions, and outcome. That real-world log is more useful than any theoretical backtest. Review it monthly to spot which alerts consistently outperform and which conditions to retire. For real examples, browse our successful automated trading strategies from actual traders.
How Do Crypto Exchanges Affect Alert Automation?
Exchanges handle automated trading differently, and the biggest variable is API rate limits. Binance allows up to 1,200 request weight per minute per IP, while more conservative venues sit far lower (Binance API docs, 2026). Match your alert frequency to those limits, along with supported order types and latency, or a busy strategy stalls at the worst moment.
Exchange-Specific Considerations
Binance offers strong API performance with low latency and high rate limits, and its REST and WebSocket APIs handle high-frequency alerts well. US users can trade on Binance.US or Coinbase Advanced, and Coinbase is usually the first pick there for its deep liquidity. Its API rate limits run lower than Binance's, which suits medium-frequency trading better than heavy scalping.
API Limitations and Alert Frequency
Every exchange caps API calls per minute, and exceeding the cap triggers temporary bans that block trades at critical moments. Design alerts around the limit: if Binance allows 1,200 requests per minute, leave a buffer for volatile periods rather than running right at the ceiling. Batch orders where the API supports it to cut call volume.
Supported Order Types per Exchange
Market orders work everywhere, but advanced types like post-only, fill-or-kill, and trailing stops vary by exchange. Limit orders with time-in-force options help your automated trades avoid terrible fills during flash crashes. Stop-loss behavior also differs: some exchanges use mark price, others last price, so know the mechanics to avoid surprise liquidations.
| Exchange | API Rate Limit | Order Types | Latency (US) | Best For |
|---|---|---|---|---|
| Binance | 1,200/min | Extensive | Medium | High-frequency |
| Coinbase Advanced Trade | 100/min | Basic-Medium | Low | US traders |
| Bybit | 600/min | Extensive | Medium | Derivatives |
| KuCoin | 300/min | Medium | Medium | Altcoins |
Rate limits are approximate as of 2026 and vary by endpoint, order weight, and account tier. Each exchange name links to its official API rate-limit documentation; verify the current numbers there before you tune alert frequency.
For a deeper comparison of exchange features and automation support, see our best exchanges for automated trading guide.
Key Takeaways and Next Steps
The single most important fact on this page: as of July 2026, the TradingView free plan gives you 3 active price alerts and 0 technical alerts. You can automate simple price-level trades by sending those alerts to TV-Hub as email signals, but indicator and strategy automation needs the paid Essential plan, which adds technical alerts and webhooks. That TradingView subscription is the only fixed cost in an automation setup.
Everything else builds on that. Start with simple price alerts, get comfortable, then add indicator and Pine Script conditions. Always paper trade before risking real money, and remember that alerts only execute a strategy; the strategy still has to be good.
When you're ready to automate, the bot doesn't have to add cost. Connect an exchange through a referral link and the TV-Hub bot is free, and demo trading needs no subscription at all. Explore the full crypto trading automation guide for position sizing, risk automation, and building a complete system.
Turn Your TradingView Alerts Into Real Trades
Build a webhook trade command with no code, connect an exchange through a referral link so the bot is free, and test the whole flow on a free demo before you go live.
Start Free Trial View DocumentationFrequently Asked Questions
As of July 2026, the TradingView free plan includes 3 active price alerts and 0 technical alerts. It has no webhook notifications, but it can still deliver price alerts to an alternative email address, so simple price-level automation through TV-Hub works on the free plan. Confirm the current per-tier numbers on TradingView's pricing page.
The free plan gives 3 active price alerts (July 2026). The paid tiers raise the limit as you move up:
- Free: 3 active price alerts, 0 technical alerts, no webhooks
- Essential: more alerts, webhooks unlock here
- Plus: higher alert limit, webhooks
- Premium: higher alert limit, webhooks
- Ultimate: highest alert limit, webhooks
Exact per-tier counts and prices change, so check TradingView's pricing page for the current figures. For automated trading you need at least Essential.
You need the Essential plan or higher. Webhook notifications are not available on the free plan, and they unlock starting at Essential. Every webhook-based trading bot requires a paid TradingView plan for this reason.
You need at least the paid Essential plan. Webhooks are not part of the TradingView free plan; they unlock on Essential and are included on every tier above it, so there's no free way to send a TradingView webhook as of July 2026. Essential runs about $12.95 per month billed annually, or $14.95 per month on monthly billing, because the yearly plan carries a discount. Check tradingview.com/pricing for the current rate in your region.
Yes, within limits. The free plan's 3 price alerts can reach TV-Hub as email signals, so you can automate simple price-level entries from a free account. What the free plan can't do is run indicator or strategy automation, because technical alerts and webhooks both start with the paid Essential plan. For fast or rule-based strategies, upgrade to Essential and run those webhooks through TV-Hub to place the trades automatically.
The bot does not have to. The TV-Hub bot is free when you connect an exchange through a referral link (Bybit, Binance, OKX, BitMEX, or KuCoin), and demo trading is always free with no subscription. Without a referral, TV-Hub starts at $23 per month with discounts on longer terms. The one unavoidable cost is TradingView's own subscription for webhooks, which every bot platform requires.
Webhook alerts send data straight to your bot and execute in under a second, which is the primary automation path on paid plans. Email alerts are slower, arriving in seconds, but they do two useful jobs: they are the only automation route on the free plan, for price alerts, and on paid plans they act as a reliability backup if a webhook is lost in transit.
Yes. The mobile app lets you create alerts with the bell icon, receive push notifications, and manage or edit existing alerts. Some advanced work, like Pine Script alerts and webhook URL configuration, is easier on the desktop version.
Use JSON with the fields TV-Hub expects. A market buy on Binance Futures with a stop loss and a two-step take-profit ladder looks like this:
{
  "token": "YOUR_TOKEN",
  "exchange": "binance-futures",
  "pair": "BTCUSDT",
  "apiKey": "binance-futures-main",
  "isBuy": true,
  "isMarket": true,
  "leverage": 3,
  "unitsType": "percent",
  "unitsPercent": 2,
  "stopLossType": "percent",
  "stopLossPercent": 1.5,
  "targets": [
    { "takeProfitPercent": 0.8, "amount": 50 },
    { "takeProfitPercent": 1.6, "amount": 50 }
  ],
  "alertTimestamp": "{{ticker}}-{{timenow}}"
}
Required fields are token, exchange, pair, and apiKey. Wrap any TradingView placeholder like {{ticker}} or {{timenow}} in double curly braces, validate the JSON before deploying, and post it to your TV-Hub webhook URL. The full field reference lives in the parameter reference.
Check your TV-Hub Activity Log first. When a trade fails, TV-Hub records it there with the reason. TradingView does not receive a usable status code back from the exchange, so the Activity Log is the place to debug, not the TradingView alert history. Common causes are a malformed JSON message, an API key without trade permissions, or insufficient balance. See the debug a failed trade alert guide to match the error to a fix.