TradingView Automated Trading: How to Auto-Execute Signals on Any Exchange (2026)
Watch the full setup (19:43): the complete TradingView-to-Bybit automation, from a free demo account to a live strategy.
Quick Summary
TradingView can't place trades on its own. TV-Hub is the bridge: connect an exchange API key (start on a free demo account with zero risk), paste a trade command into a TradingView alert webhook, and every signal executes automatically. No coding, no app running, and you can test the whole flow before a single cent is on the line.
TradingView is where most crypto traders build their edge. The problem starts the moment a signal fires and you're not at your desk. TradingView can spot the setup, but it can't place the trade for you.
That's the gap TV-Hub closes. It takes any TradingView alert and executes it on a real exchange automatically, with no coding and no app left running on your machine. In this guide you'll set the whole thing up from scratch, and you'll do it on a free Bybit demo account, so you risk nothing while you learn.
We'll follow the exact flow from the video above: connect an exchange, build a trade command, fire it from a TradingView alert, then layer on stop losses, position sizing and full strategy automation. You can follow the same steps in our docs Quick Start as you go. Prefer to watch instead of read? The full walkthrough is pinned at the top.
🚀 Quick Start: Choose Your Exchange
This guide uses Bybit, but the same steps work everywhere. We've built dedicated setup guides for the most popular exchanges, each with webhook templates and API configuration walkthroughs.
Can You Automate Trading on TradingView?
Yes, but with one catch: TradingView only sends signals, it doesn't execute trades. To automate anything, you need a bridge that receives the signal and places the order on an exchange for you. That bridge is what turns a chart alert into a real, filled position.
There are two ways to build that bridge. TradingView's native broker integrations are free but limited, mostly to futures and stock brokers, with no real crypto exchange support. The second path is a webhook plus an execution service, and it works with any exchange and needs no code. TV-Hub takes the webhook path and connects to Bybit, Binance, OKX, Coinbase, KuCoin, Bitget and Hyperliquid.
Everything below runs on a free Bybit demo account first. You'll build the full system, fire real orders against paper funds, and only swap in a live key once you're happy. Want to understand alerts in more depth first? Read our TradingView alerts setup guide.
What You Need Before You Start
You need three accounts, and there's no software to install on your computer. TV-Hub and your exchange demo account are free, and TradingView is free to sign up. But be clear on one thing up front: for automation to be practical you'll want at least TradingView's cheapest paid plan (more on why below).
- A free TV-Hub account: the bridge that receives signals and executes them.
- A TradingView account: where your signals come from. As of July 2026 the free plan is capped at 3 active price alerts, with no technical (indicator or strategy) alerts and no webhooks. You can still automate simple price-level triggers from a free account, since TradingView delivers those price alerts to an alternative email address and TV-Hub accepts email signals, but that route is limited to 3 price alerts and email is slower than a webhook. For real strategy automation, plan on at least Essential, TradingView's cheapest paid plan, which unlocks webhooks.
- An exchange account: we use Bybit here. If you sign up through TV-Hub's Bybit referral link, you can trade live through TV-Hub for free, for life. Bybit shares a portion of the trading fees you'd pay anyway with TV-Hub, at no extra cost to you, and that covers your subscription. If you already have a Bybit account, that's fine too.
On a demo account, the balance is paper money. Nothing you do here touches real funds, which makes it the perfect place to test that every part of the setup works.
Teach Your AI Assistant How TV-Hub Works
Here's a shortcut most traders miss: you don't have to memorise every option. TV-Hub publishes a single plain-text file that teaches an AI assistant the entire platform in one paste. Feed it to ChatGPT, Claude or Gemini, and the model can build trade commands and strategies for you.
Open the file, copy everything, and paste it into the chatbot of your choice. From then on you can ask it real questions: how to build a specific strategy, how to structure a trade command, or how to drop that command into a TradingView alert. It's like having a TV-Hub expert sitting next to you, and our how to prompt guide shows the best way to ask.
🤖 Teach your AI in one paste
Open a fresh ChatGPT, Claude or Gemini conversation and paste this first, then ask your question. It points the model at the exact TradeCommand schema and the full docs map, so it can build schema-correct commands and strategies for you.
Full guidance: the docs for AI assistants and how to prompt.

Create Your Bybit API Key (Demo or Live)
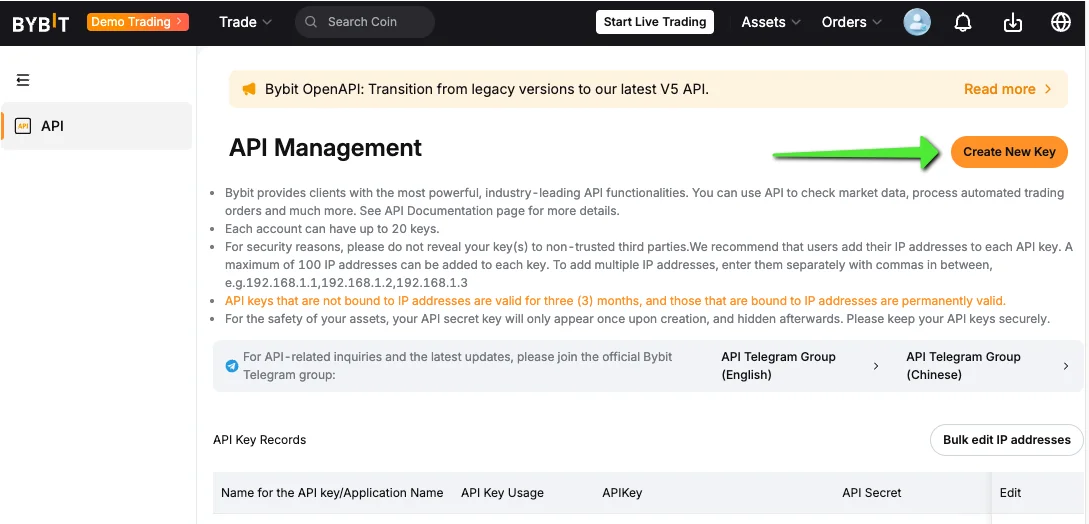
Start inside Bybit. Open Tools → Demo Trading, click the user icon at the top, open the API section, and create a new key. For a demo account, use the first option (system-generated keys). That's all a demo setup needs.
Setting up a live account? We strongly recommend choosing "connect to third-party applications" and selecting TV-Hub from the dropdown instead. This does two important things: the API key never expires, and only TV-Hub's IP addresses are whitelisted, so the key is useless to anyone else.
Give the key a clear name. For permissions, select Read and Write for Unified Trading and leave the other options unchecked. Bybit then shows you the API key and secret once. Copy both, because you'll paste them into TV-Hub next. The Bybit demo account guide walks through each step with screenshots.
Connect Bybit to TV-Hub
Back in TV-Hub, open Settings → API and click Add API. Select Bybit, enter a name, paste the API key, then do the same with the secret key. Finally, check the Demo Account box so TV-Hub routes orders to Bybit's demo environment. Short setup instructions sit right there on the page if you need them.
Create the connection and you're live. Go back to the dashboard and the warning banner at the top has disappeared, because an exchange is now connected. Pick a clear name here, because you'll reference it later when you decide which account a trade should run on.
You can add more than one API. If you run two, three or four accounts, add each key and give it a distinct name. A dropdown then appears where you choose the active account, and any trade command you build executes only on the account you selected. See connecting accounts and API keys for the full details.


Place Your First Automated Trade
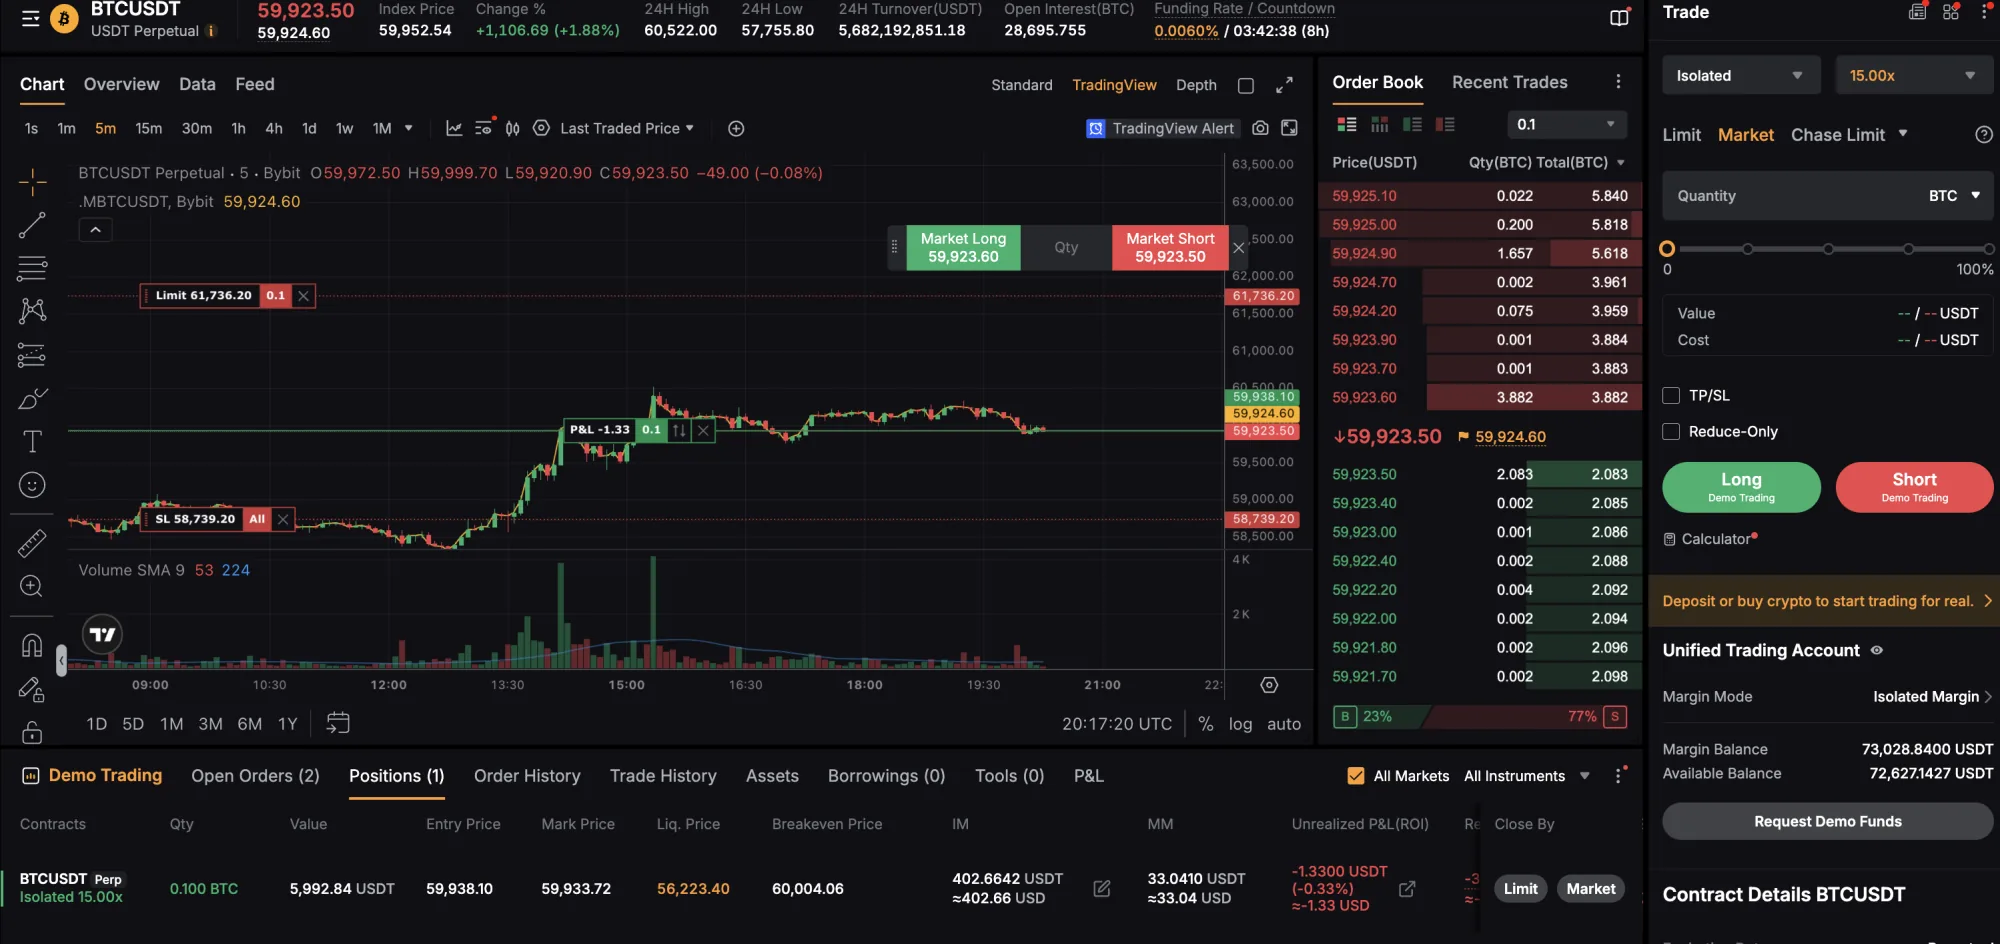
Before you touch TradingView, prove the connection works from TV-Hub's own order builder. Select BTCUSDT and you'll see your options: create a buy order, a sell order, cancel pending orders, or close a position. We'll cover every one of those in detail further down.
For a quick test, choose Absolute Value and buy 0.1 BTC, set the leverage to 15, choose Cross, and leave the rest as-is. On the right side, the trade command is generated automatically. That JSON is the same command you'll later paste into TradingView, so it's worth a glance now.
You can fire the command straight from here with the Execute now! button. The order executes and the position appears immediately. This builder is the fastest way to confirm the technical setup is sound before any signal is involved. To close, select Close Position, then Close All, and it clears whether the position is long or short. For a full breakdown of every field, see the trade command builder docs, and the Test a Trade guide for firing orders straight from the builder.

Add a Stop Loss and Take Profit
Now build a slightly larger setup. Add a stop loss at, say, minus 2%, and add a take profit. For the take profit you can set the target as a percentage of the entry (2% or 4%, for example) or as an absolute price, and you can close the full position or only part of it (100%, 50%, or a fixed amount like 0.05 of 0.1 BTC).
Here's a detail that saves you money over time. When you execute the trade and scroll down, you'll see the stop loss and the take profit behave differently. The stop loss is attached directly to the position. The take profit is placed as a separate real limit order. Because that limit order fills at your price rather than at market, you pay the maker fee instead of the taker fee. On every winning exit, you're the maker, not the taker. Prefer the take profit attached directly to the position like the stop loss instead? Add "setTpToPosition": true to your trade command to override this default. Every option is covered in the stop loss and take profit docs.
Track and Debug Every Trade
Every order TV-Hub sends lands in the Activity Log. It's both your record of what happened and your first stop when something misfires. If a trade doesn't behave as expected, this is where you find out why.
Click any entry to see the exact trade command that triggered it. That means you can trace a fill straight back to the command that caused it, which turns most "why did that happen?" moments into a ten-second check rather than a guessing game. The activity log docs explain what each status means.

Get Trade Alerts on Telegram
Want every trade to land on your phone? TV-Hub pushes trade activity to Telegram in about a minute of setup. Go to Settings and start the bot by clicking the link, then send /start in Telegram. Copy the access key it gives you and paste it into the field in TV-Hub.
From that point on, every trade also arrives as a Telegram message. There's a separate feature, Telegram trading, that lets you forward Telegram signals into trades, but that's a different workflow. We cover it in its own tutorial, linked from the settings page. Step by step: the Telegram setup docs, plus the Telegram bot overview.

Trigger a Trade From a TradingView Alert
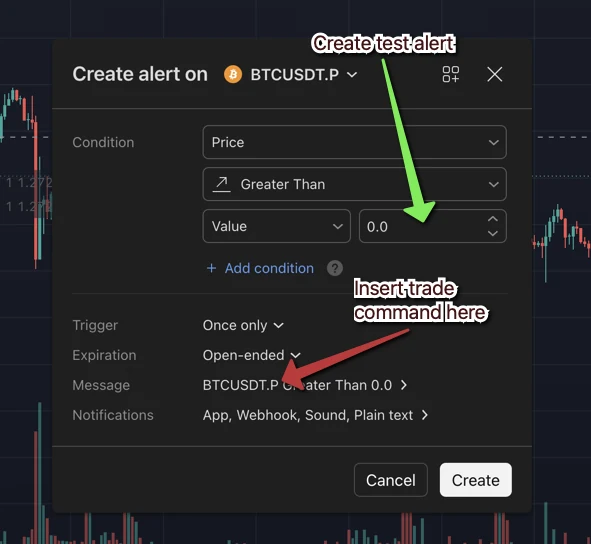
This is the part that makes it automated. In the builder, scroll down, click Generate, then Copy to grab your trade command. Switch to TradingView and create an alert. For this demo we keep the condition deliberately simple: Greater than, price greater than zero, so it fires the moment you save it.
Open the Message field and paste in your trade command, then name the alert (the warning TradingView shows can be ignored). Under Notifications, enable Webhook URL and paste in the TV-Hub webhook endpoint. You'll find every endpoint in the webhook documentation. There's a standard endpoint (https://alerts.tv-hub.org) for most use cases, a low-latency endpoint for very small timeframes, and a dedicated Binance endpoint (https://binance.tv-hub.org) that Binance traders should use.
One note on plans: webhooks require a paid TradingView plan. They start with Essential, TradingView's cheapest tier, so that's the practical minimum for real automation. The free plan has no webhooks and no technical alerts (as of July 2026 it's capped at 3 active price alerts). You can still drive simple automation from those price alerts, because TradingView delivers them to an alternative email address and TV-Hub accepts email signals, but that route is limited to 3 price-level alerts and is slower than a webhook. TV-Hub's email-alert backup also matters on paid plans as a reliability fallback: if a webhook is ever delayed, an email alert can drive the same trade (follow the email backup docs and keep the "Send plain text" checkbox enabled). Essential is the only fixed cost here, and the TV-Hub bot itself is free for life through an exchange referral, or from $23/month without.
Save the alert. Because the test condition is price greater than zero, it triggers immediately, and you'll see the execution and the trade appear in TV-Hub. The same command structure closes a position too. That's a full round trip: a signal in TradingView becoming a real fill on Bybit, hands-free.
Ready to Automate Your Own TradingView Signals?
Create a free TV-Hub account and run this exact setup on a Bybit demo, with zero risk.
Start Free Trial View DocumentationHow to Automate a TradingView Strategy or Indicator (No Code)
In a real setup you'd never fire trades by hand like we just did. Instead you connect an indicator or a strategy, and the signal itself does the triggering. TV-Hub handles both, and neither needs a line of code.
Automating an indicator
An indicator can fire buy and sell signals but doesn't run backtests. You create one alert for the buy signal and one alert for the sell signal, and the trade command inside each alert defines the direction. For indicators that alternate between long and short, enable Close Current Position so TV-Hub closes the opposite position before opening the new one. That's how you flip cleanly from long to short without stacking positions. See the indicator alerts docs for the exact alert setup.
Automating a strategy
A strategy, like a pivot reversal, also sends buy and sell signals, but unlike an indicator it doesn't expose separate buy and sell alert conditions. For this, turn on Enable Strategy Alerts. Your trade command then carries placeholders that TV-Hub fills automatically from the strategy's signal: a buy signal becomes buy, a sell becomes sell, and a close becomes flat or close. TV-Hub reads those values and executes a buy, a sell, or closes the current position. That single option is what lets one alert automate an entire strategy. Full details are in the strategy alerts docs and the placeholder reference.
If you write your own Pine strategies, you can define different alert messages in code, sending a buy, sell or close command directly from the script. Either way, both indicators and strategies end up fully automated. For a deeper dive into alert conditions for both, see our alerts setup guide and the dedicated alerts video.

Advanced Trade Command Options
The builder scales from a one-line market order to a fully risk-managed setup. Once your basics work, these are the options that let you size, scale and control every trade. Everything here is optional, and the video walks through each one in order.
Order direction and cancelling orders
Beyond buy and sell, the Cancel Orders option removes open orders. You can cancel all open orders, or only the ones that would add to a position, such as DCA orders. These are separate trade commands that specific conditions can trigger.
Position sizing
Absolute Value sets the exact amount in the base asset (BTC for BTCUSDT, ETH for ETHUSDT). You can also size from your available balance (say 10%), or from your total wallet balance, which includes open positions and is riskier because a trade can fail if the free balance is too low. For experienced traders, the risk option sizes automatically: define how much of the account you'll risk (1% of a $10,000 account is $100), pair it with a stop loss, and TV-Hub calculates the position size from your risk and the distance to the stop. To size in the quote asset (USDT) instead, enable Use Fixed Size and enter the amount in the cost field, for example 500 USDT. The position sizing docs cover every mode in detail.
DCA and scaling in
DCA orders let you scale into a position instead of entering all at once. Set a total size of $600 across five DCA orders placed 3% below your average entry, and TV-Hub splits it: $100 fills immediately at market, and five further $100 orders sit below. A setup like this pairs neatly with a 4% stop loss protecting the whole position. See DCA and scaling for the full setup.
Stop loss and take profit control
Stops can be a percentage (4% below the average entry) or an absolute price ($57,000), which is ideal when a Pine strategy calculates a dynamic stop and inserts the exact price into the command. You can add a trailing stop that lives on the exchange with a set trail distance, and a break-even option that stops the trailing logic once price reaches your entry. Take profits support multiple targets too: close 40% at the first and the remaining 60% at the second, each as a percentage or an absolute price.
Execution controls
Prevent Pyramiding skips new signals while a position is already open. Close Current Position closes the opposite side before opening a new one, for clean long-to-short flips. Cancel Pending Orders clears old stops, take profits or limit orders before a new setup. Conditional Pyramiding caps total position size (in base or quote asset): set a 500 USDT max, and if two 200 USDT orders already exist, the next signal is reduced to the remaining 100 USDT automatically. There's also a Delay option to hold execution by a set number of seconds (5, 10, or 120).

Copy Trading and Going Live
Once your setup runs cleanly on demo, you have two ways forward. You can broadcast it as a copy-trading signal so other TV-Hub users follow your trades automatically, which we explain in a separate copy-trading video and the create a signal docs. Or you can take it live yourself.
Going live is deliberately simple: swap the demo API key for a live key, and the exact same commands now run on real funds. Before you do, run the go-live basics, start with small position sizes, never grant withdrawal permission on the API key, keep 2FA on, and use the third-party (IP-whitelisted, non-expiring) key type from earlier. See the before you go live checklist in the docs.
From here, the documentation goes much deeper than any single video can. You'll find full guides for the copy-trading system, the Telegram bot, our Chrome extensions, backtesting tools, and direct trading on exchanges, plus a complete reference for every trade command option and boilerplate code you can drop into your own strategies.
Start Automating on a Free Demo, Today
Sign up for TV-Hub, connect a Bybit demo account, and fire your first automated TradingView trade with zero risk.
Start Free Trial View Documentation