Trade Command Builder — Complete UI Walkthrough
- The Trade Command Builder is the visual way to construct a trade command. No hand-written JSON required.
- Pick a pair, choose direction, set size, stop loss and take profits, then click Generate to copy the JSON.
- The JSON goes into your TradingView alert Message field, or you can Execute now! to fire the trade straight away.
- Every control maps to one field on the Trade Command schema. This page indexes the mapping.
The Builder lives on every exchange page (Binance, Bybit, OKX, KuCoin, BitMex, Coinbase). Open it from your exchange page, for example Exchange → Bybit. The core controls are the same everywhere — only exchange-specific toggles appear conditionally.

The walkthrough below follows the form top to bottom.
Pair, account and direction

- Futures / Spot — switches the whole form between the spot and derivatives market for this exchange. On Spot, the futures-only controls (leverage, margin, hedge) disappear.
- Pair — the symbol you want to trade, in the exchange's native format (
BTCUSDTon Binance/Bybit,SOL-USDT-SWAPon OKX). The label shows the available balance in the quote currency. Maps topair. - API Key — which of your stored keys runs the trade. Pick a key flagged as Demo to route to the exchange's paper-trading endpoint. Maps to
apiKey. This dropdown only appears when you have more than one API key for the exchange; with a single key it's used automatically. See Account & API Keys. - BUY / SELL / Cancel Orders / Close Position — what the alert does:
- BUY opens a long (or buys on spot) →
isBuy: true - SELL opens a short (or sells on spot) →
isSell: true - Cancel Orders cancels resting orders without entering →
cancelAllOrders/cancelAllDcaOrders - Close Position flattens an open position and opens its own set of close options →
isClose: true. See Closing a position below.
- BUY opens a long (or buys on spot) →
Position size and order type
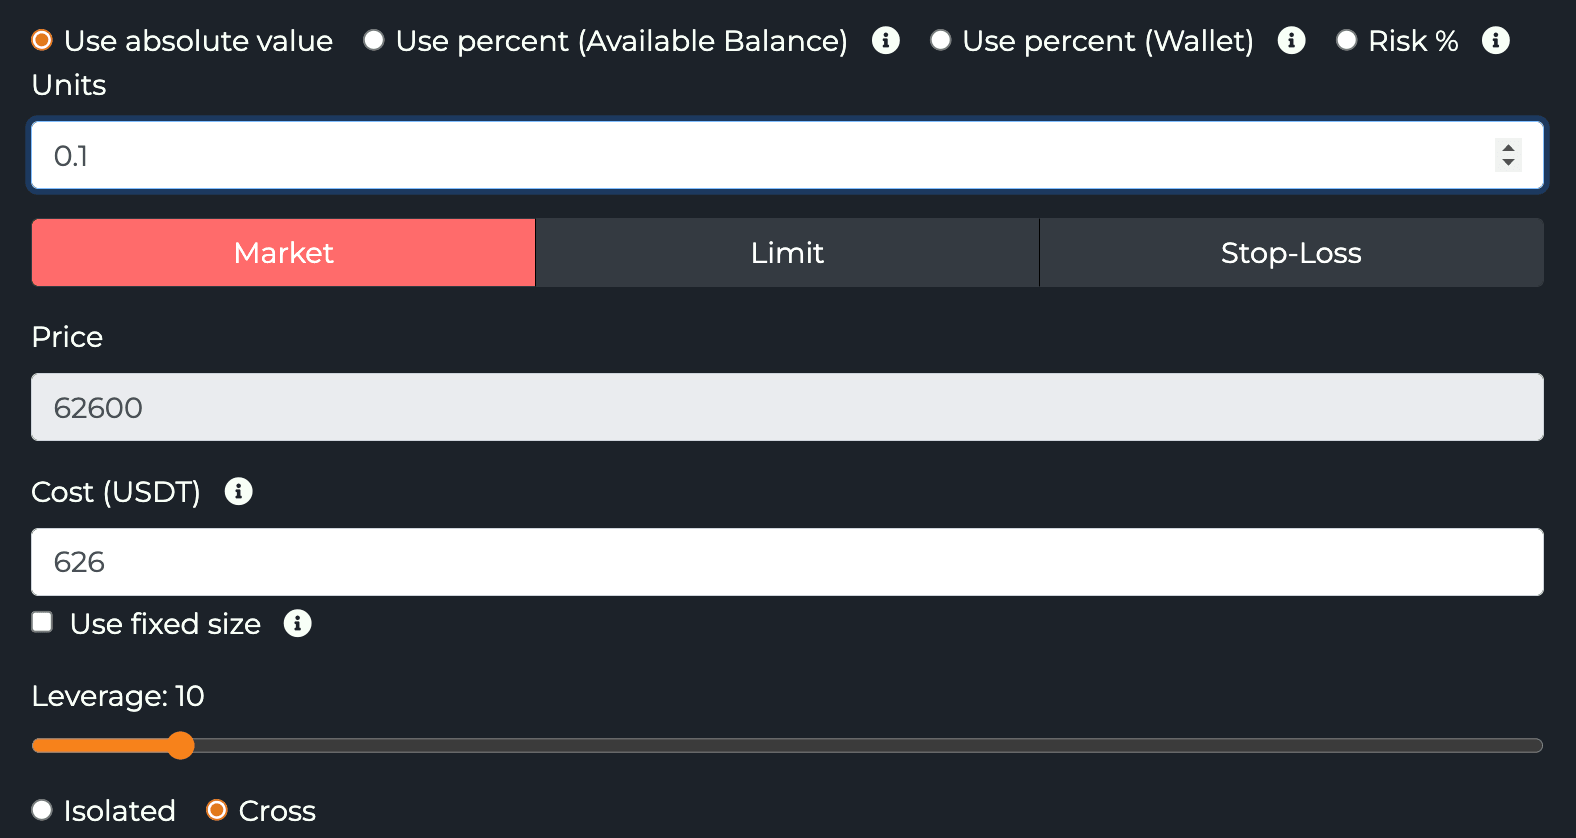
Size method (the four radios) decides how the position size is calculated:
| Radio | TradeCommand fields | Notes |
|---|---|---|
| Use absolute value | unitsType: "absolute", units | Fixed amount (e.g. 0.1 BTC) |
| Use percent (Available Balance) | unitsType: "percentBalance", unitsPercent | % of free margin |
| Use percent (Wallet) | unitsType: "percentWallet", unitsPercent | % of total wallet balance |
| Risk % | unitsType: "risk", unitsPercent | Sized so an SL hit equals that % of balance (needs an SL) |
Full sizing detail: Sizing.
- Units — the order size in base units. Used only with Use absolute value →
units(accepts small decimals, e.g.0.001). In the percent and risk modes the value goes tounitsPercentinstead. - Use fixed size — locks the order to a fixed quote amount (for example $100) →
useFixedSize+fixedQuoteSize. - Market / Limit / Stop-Loss — how the entry is placed:
- Market →
isMarket: true - Limit →
isLimit: trueplus the Price field.limitPriceTypecontrols whetherpriceis honoured as-is or pinned to the best bid/ask. See Limit Order Management. - Stop-Loss is for SL-only updates on an existing position, not an entry type. See Stop-loss-only command below.
- Market →
- Price — the limit price (disabled for Market). Maps to
price. - Cost (USDT) — normally a calculated helper showing the notional cost of the order. When Use fixed size is enabled, this is where you type the fixed quote/USD amount →
fixedQuoteSize. - Leverage (futures only) — the leverage slider →
leverage. - Isolated / Cross — per-pair margin mode →
marginType. See Futures-Specific Fields.
Limit order chasing
With a Limit order, chasing keeps re-placing the order at the front of the book for as long as it stays unfilled, so it fills as a maker without you babysitting it. The extra controls appear once you pick Limit.

- Use best price (Best Bid/Ask) — required for chasing. It pins the order to the current best bid (buys) or best ask (sells) instead of a fixed price →
limitPriceType: "bestPrice". - Use order chasing — re-places the order at the moving best price until it fills or the attempt budget runs out →
chaseLimitOrder: true. If not filled, pick what happens after the last attempt: Execute market order →updateLimitOrderBuyMarketAfterNotFilled: true, or Cancel order →false. - Change update interval — adjust the delay between attempts →
updateLimitOrderTimeInterval(the Delay in sec field, default20).
By default the order updates every 20 seconds, up to 180 times, so the chase runs for about an hour before it gives up. The interval can be as short as 1 second or as long as 300 seconds, but the attempt count stays at 180 regardless: a 1-second delay shortens the whole chase to roughly 3 minutes. Very short delays can trip exchange rate limits, so keep the interval reasonable.
Full field reference and the standalone update/close flows: Limit Order Management.
DCA (Order-Mesh)
Use DCA (Order-Mesh) spreads the entry across a ladder of limit orders instead of a single fill → useDca.

- The slider and
%box set the price range the ladder spans, measured from the current price →dcaPercent. - Number of orders is how many legs the range is split into →
dcaOrderCount.
So 5% with 4 orders places four limit orders spread across a 5% band below (long) or above (short) the entry. Full mechanics, including the absolute-price (scaledLowerPrice / scaledUpperPrice) and distribution-style options, are on DCA & Scaling.
Stop loss
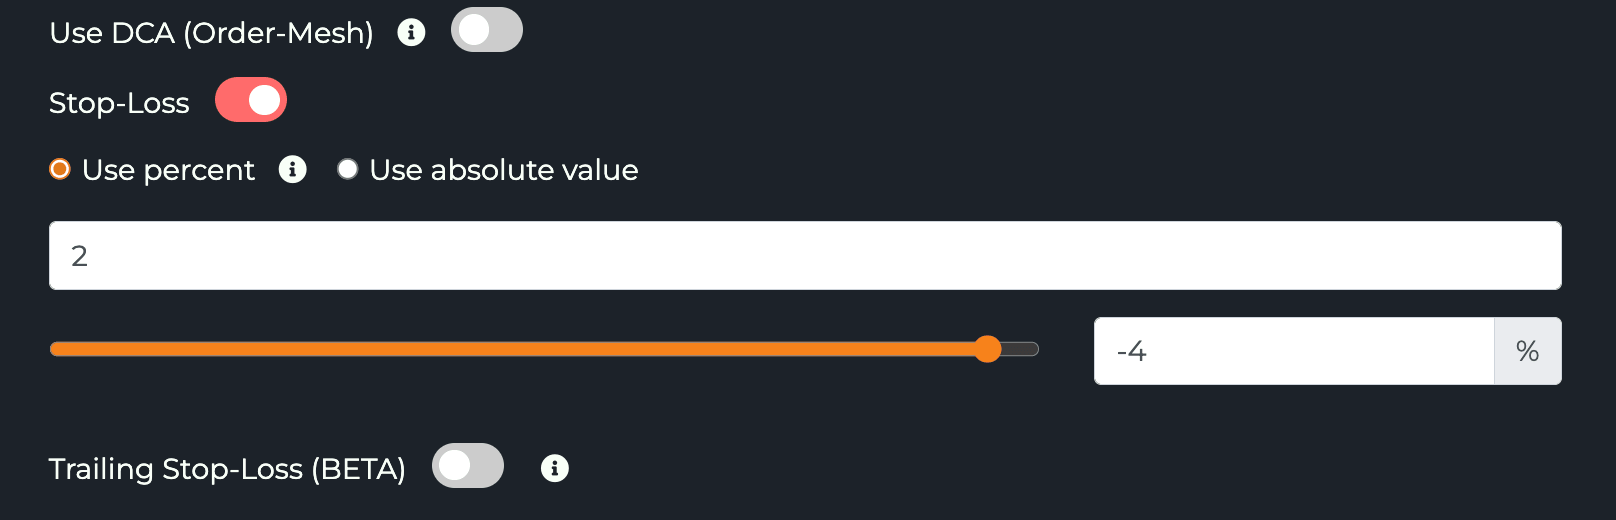
Toggle Stop-Loss on to attach a protective stop, then pick the method:
- Use percent →
stopLossType: "percent",stopLossPercent. The slider and the%box set the same value (distance from entry). - Use absolute value →
stopLossType: "absolute",stopLoss(a price).
Trailing Stop-Loss (BETA) turns the stop into a trailing stop that follows price in your favour → useTrailingStopLoss, trailingStopLossPercent.

The slider and % box set the trailing threshold. On most exchanges TVH places a separate conditional trailing order using that threshold, so the stop is maintained exchange-side.
Set to break-even is available only on Bybit and Binance Futures. With it on, the stop stops trailing once price reaches the threshold area relative to the average entry, locking the position in at break-even instead of continuing to trail.
Full mechanics, break-even and ATR expressions: Stop Loss & Trailing.
Stop-loss-only command
Picking Stop-Loss in the order-type row builds a command that places or updates a stop on an existing position, without opening a new one → isStopLoss: true.
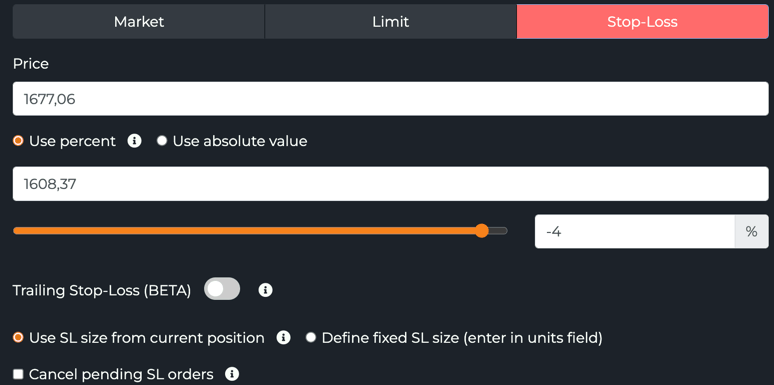
- Price — the stop trigger price →
price. - Use percent / Use absolute value — set the level as a percent distance from entry (
stopLossType: "percent",stopLossPercent) or as a fixed price (stopLossType: "absolute",stopLoss). - Trailing Stop-Loss (BETA) — make the stop trail price in your favour →
useTrailingStopLoss. - Use SL size from current position — size the stop to whatever the position currently holds →
stopLossSizeType: "currentPosition"(the default). Define fixed SL size instead reads the amount from the Units field →stopLossSizeType: "absolute". - Cancel pending SL orders — clear any existing stop orders before placing the new one.
Use this to manage risk on a position you opened earlier, for example moving a stop to break-even after a TradingView signal.
Take profit
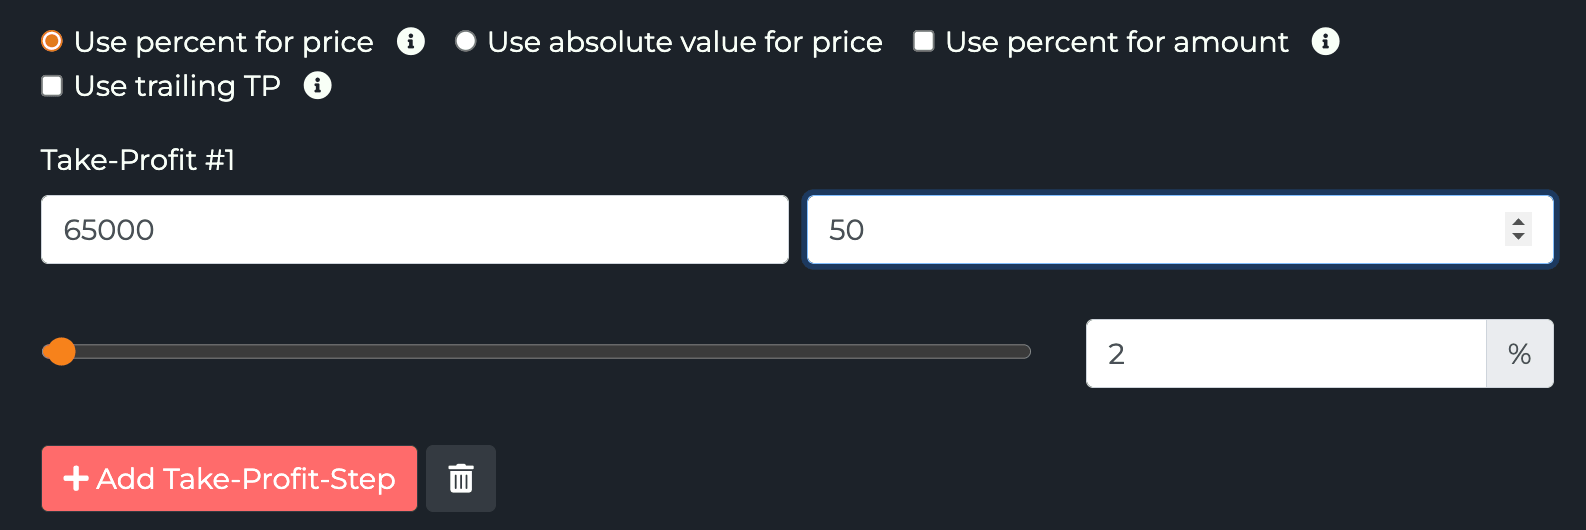
Click + Add Take-Profit-Step to add a target row. Each row has a price and an amount. Two independent toggles at the top decide how those two fields are read — they're easy to mix up, so here's each one on its own.
Price: percent or absolute
Use percent for price — set the distance in the % box (here 10); the price field shows the resulting price. Maps to takeProfitPercent.

Use absolute value for price — type the exact target price into the price field instead. Maps to the target's price.

Amount: absolute or percent
By default the Amount field is an absolute quantity (base units, or contracts).

Tick Use percent for amount and the field turns into Amount in % — the share of the position to close at this step. Maps to targetAmountInPercent: true; the percents across all steps must sum to ≤ 100.

Worked example
Put both toggles together: with Use percent on, a single target that says amount 100 at 5% means "close 100% of the position when price is 5% above the average entry". Change the amount to 50 and you exit half there, leaving the rest to run.

Stacking steps
Stack as many steps as you like; the order matches the form. They become the targets[] array, and the trash icon removes a step. To make a step trail instead of being a fixed exit, see Set a trailing take-profit below.
Full picture, including the amount-summation rule: Multiple Take Profits.
Take-profit-only command
You can also send a standalone take-profit order against a position you already hold, rather than attaching TPs to an entry. Pick the exit direction (SELL to take profit on a long, BUY on a short), choose the Limit order type, and select the Use TP size from current position size option.
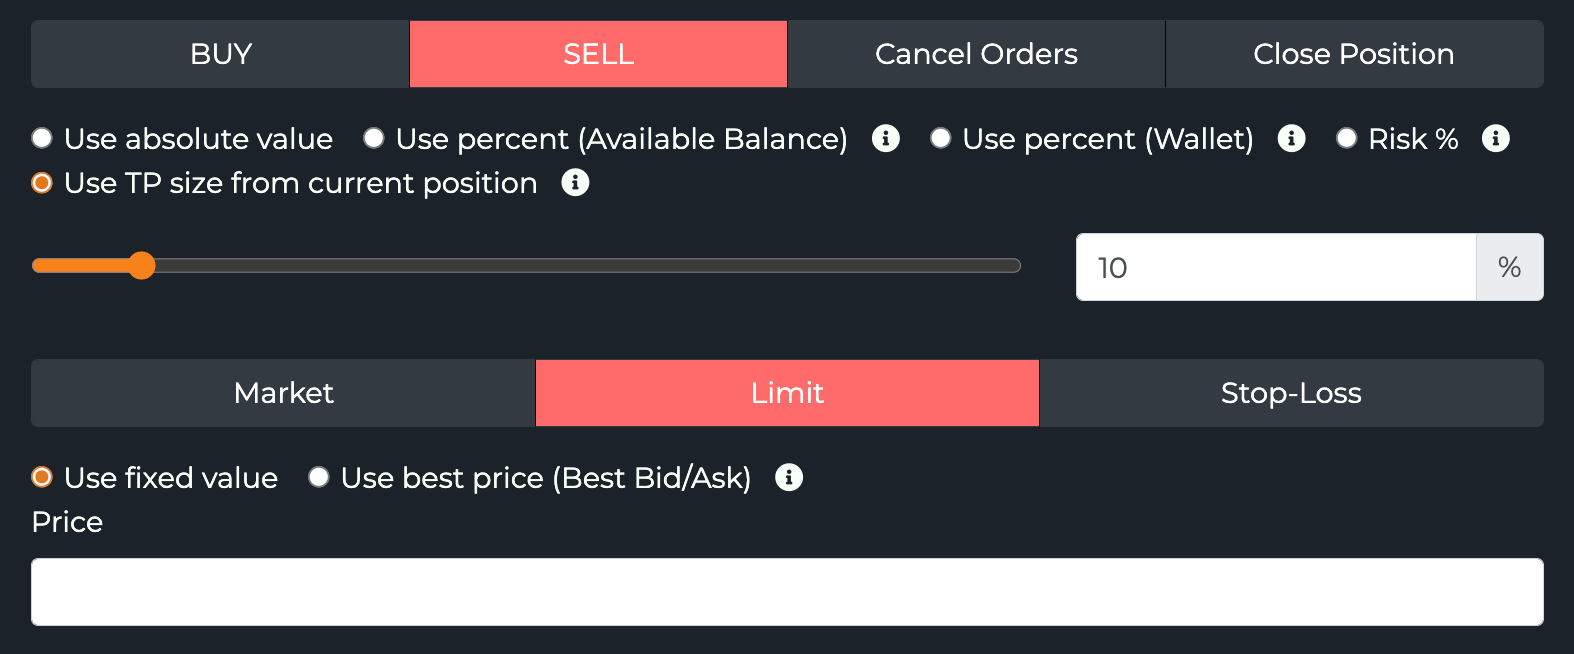
- Use TP size from current position sizes the order as a percent of your open position →
unitsType: "percentPosition". As the tooltip notes, this option is for take-profit orders — the order only executes if you have an open position. - Use fixed value sets the limit at the price you type (
limitPriceType: "fixedPrice"); Use best price (Best Bid/Ask) pins it to the current touch (limitPriceType: "bestPrice"). - Combine it with
reduceOnly: trueso the order can only ever shrink the position, never flip or add to it.
Set a trailing take-profit
A trailing take-profit arms once price reaches an activation level, then follows price by a callback offset and closes the slice on the pullback. There are two ways to submit one.
1. Attach it when you open the position. Click + Add Take-Profit-Step, then tick Use trailing TP on the target row.
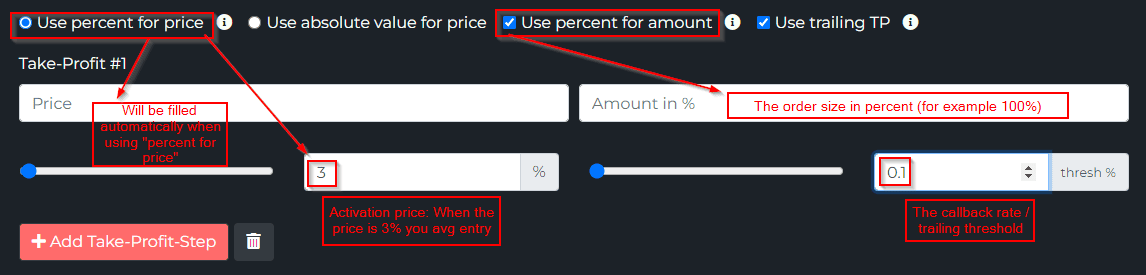
| Field | Maps to | Meaning |
|---|---|---|
percent box (here 3) | takeProfitPercent | Activation distance. Trailing arms once price is 3% above average entry. |
Amount in % (here 100) | amount + targetAmountInPercent: true | Share of the position this trailing slice covers. |
thresh % (here 0.1) | trailingPercent | Callback rate. After arming, the exit trails 0.1% behind the peak. |
{
  "pair": "BTCUSDT",
  "isBuy": true,
  "isMarket": true,
  "unitsType": "percent",
  "unitsPercent": 95,
  "leverage": 5,
  "targetType": "percent",
  "targetAmountInPercent": true,
  "targets": [
    { "idx": 0, "takeProfitPercent": 3, "amount": 100, "trailingPercent": 0.1 }
  ],
  "exchange": "BinanceFutures",
  "apiKey": "Key1",
  "token": "<token>"
}
On Binance Futures you can attach multiple trailing TP orders. On Bybit only one is allowed.
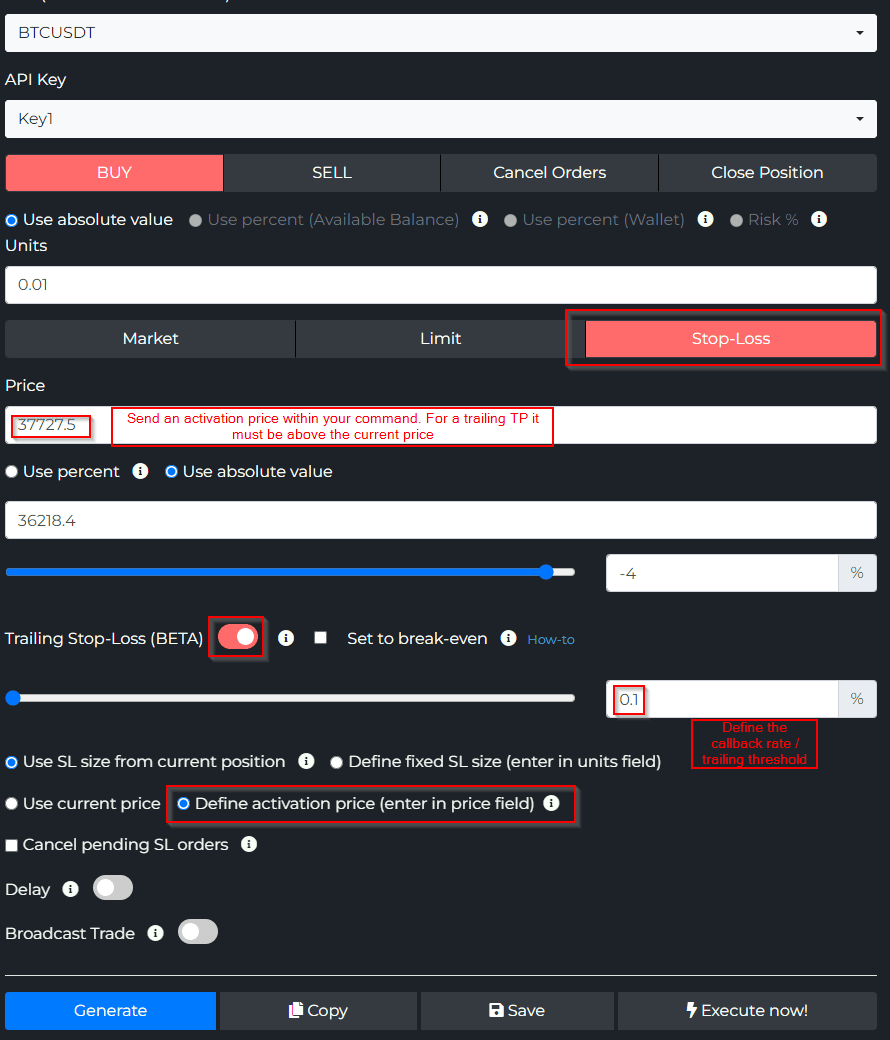
2. Send a standalone trailing take-profit. To trail profit on a position you already hold, build it from the Stop-Loss order type with Trailing Stop-Loss (BETA) on and Define activation price (enter in price field) selected. The price you enter is the activation level, and for a trailing TP it must be above the current price (long).
{
  "pair": "BTCUSDT",
  "isStopLoss": true,
  "useTrailingStopLoss": true,
  "trailingStopLossPercent": 0.1,
  "price": 37727.5,
  "stopLossSizeType": "currentPosition",
  "exchange": "BinanceFutures",
  "apiKey": "Key1",
  "token": "<token>"
}
Here price: 37727.5 is the activation level (above market), trailingStopLossPercent: 0.1 is the callback offset, and stopLossSizeType: "currentPosition" sizes the exit to whatever the position holds. See Trailing per target for the field reference.
Closing a position
Picking Close Position in the direction row swaps the entry controls (size, order type, SL, TP) for close-specific options.
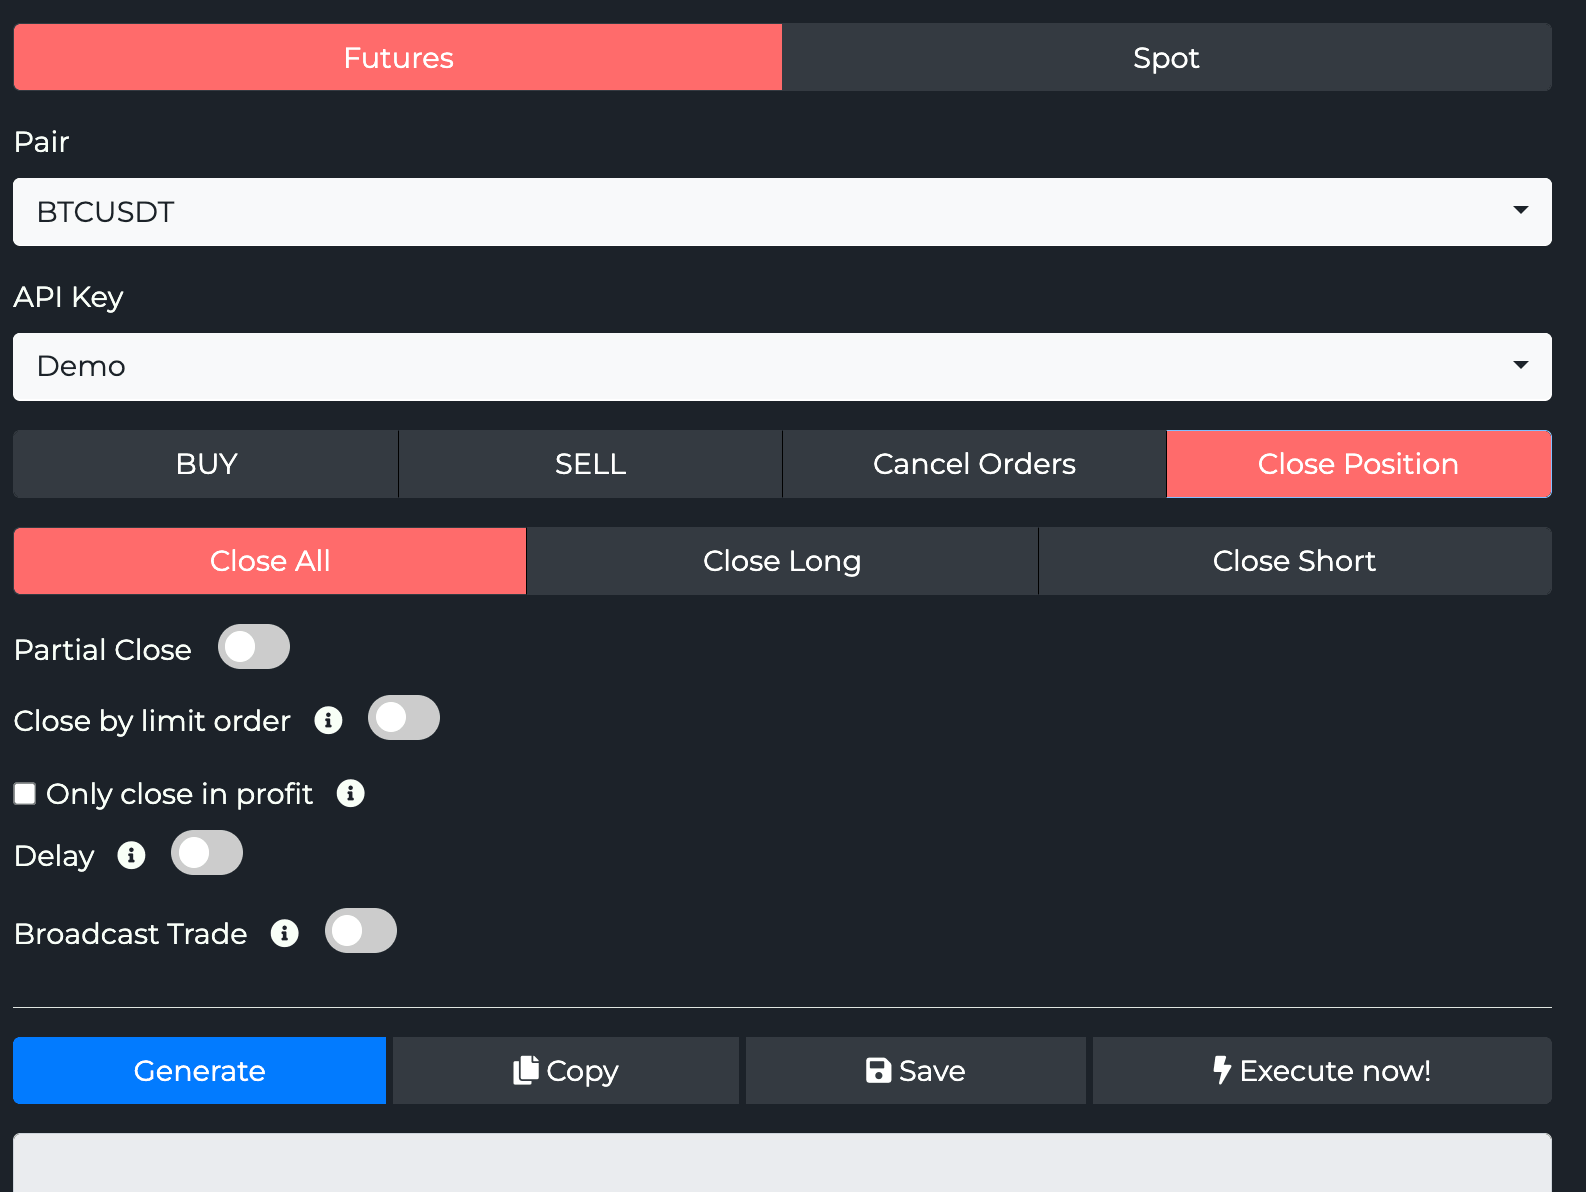
- Close All / Close Long / Close Short — what to flatten. Close All exits the whole position regardless of side →
isClose: true. Close Long / Close Short target one side in hedge mode →closeLong/closeShort. - Partial Close — close only part of the position instead of all of it →
usePartialClose+partialCloseValue/partialCloseType. - Close by limit order — exit with a resting limit instead of a market order →
useLimitClose. Without it, a close is always a market order. - Only close in profit — skip the close unless the position is in profit →
closeInProfit+closeInProfitValue. - Delay — hold execution for a set number of seconds →
delay. - Broadcast Trade — forward the close to your copy-trade followers.
Full mechanics: Close & Cancel and the partial/profit-only options on Conditional Logic.
Advanced toggles and generating the command
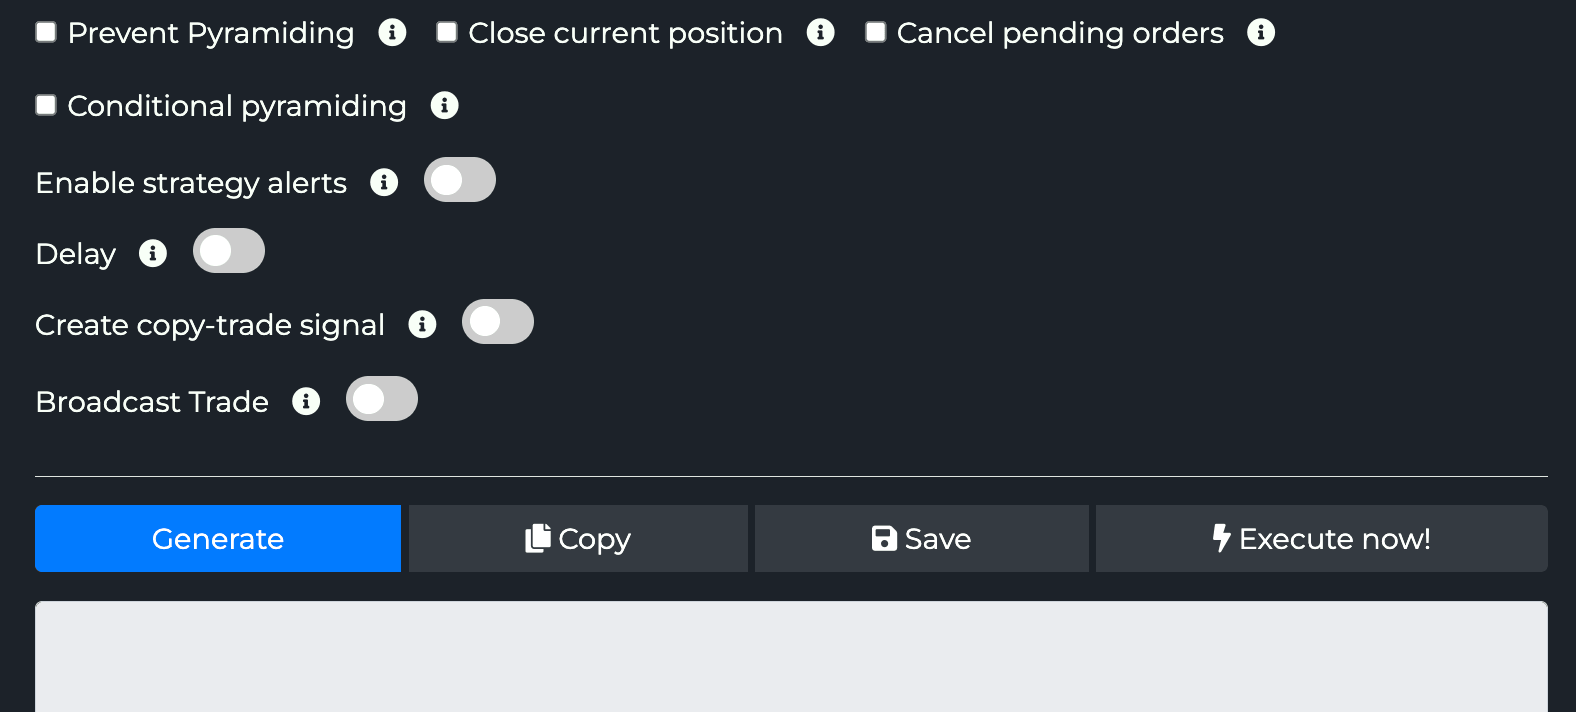
The advanced row covers guards and routing, all optional:
- Prevent Pyramiding — reject a new entry if a position is already open →
preventPyramiding. - Close current position — flatten the opposite side before entering, for clean flips →
closeCurrentPosition. - Cancel pending orders — clear resting orders as part of this command →
cancelAllOrders. - Conditional pyramiding — allow stacking only while the position stays under a cap. Checking it reveals a Max size field and a Base / Quote Asset toggle: new entries are accepted until the total position reaches that size, measured in either the base coin or the quote currency. Maps to
conditionalPyramiding+pyramidingValue(the cap) +conditionalAsset(base or quote). See Conditional Logic.

- Enable strategy alerts — switches the payload to the TradingView strategy-alert template form (
orderType+strategyCommentdrive the direction). See Strategy Alerts. - Delay — hold execution for a set number of seconds →
delay. - Create copy-trade signal / Broadcast Trade — publish this trade to your followers. See Copy Trading.
The buttons at the bottom:
- Generate — builds the JSON from the current form and shows it in the box below.
- Copy — copies that JSON to the clipboard, ready to paste into a TradingView alert's Message field.
- Save — stores the setup server-side as a reusable template. The document icons at the top-left (new / copy / open) manage saved templates. See Save, Load, Paste.
- Execute now! — skips TradingView and fires the trade straight to the exchange. Handy for verifying API-key permissions or smoke-testing on a demo key.
What the generated JSON looks like
After Generate, the JSON appears in the box under the buttons. A market long with leverage, a 2% stop and two take-profits looks like this:
{
  "pair": "BTCUSDT",
  "isBuy": true,
  "isMarket": true,
  "unitsType": "percentBalance",
  "unitsPercent": 10,
  "leverage": 10,
  "marginType": "cross",
  "stopLossType": "percent",
  "stopLossPercent": 2,
  "targets": [
    { "idx": 0, "takeProfitPercent": 2, "amount": 50 },
    { "idx": 1, "takeProfitPercent": 5, "amount": 50 }
  ],
  "targetType": "percent",
  "targetAmountInPercent": true,
  "exchange": "BinanceFutures",
  "apiKey": "MyKeyName",
  "token": "MY-TOKEN",
  "alertTimestamp": "{{ticker}}-{{timenow}}"
}
Paste this entire JSON into the Message field of your TradingView alert. The webhook URL is set separately — see Webhook URLs & IP.
Where to go from here
- First time? Walk through the form with a paper trade — see Quickstart.
- Using this with Pine? Read Alert Message JSON Format and Strategy Alerts.
- Wiring up the webhook? Webhook URLs & IP Whitelist.
- Every field documented? Parameter Reference — All 84 Properties.